


🌱 Turn scraps into gold with zero hassle—your garden’s secret weapon!
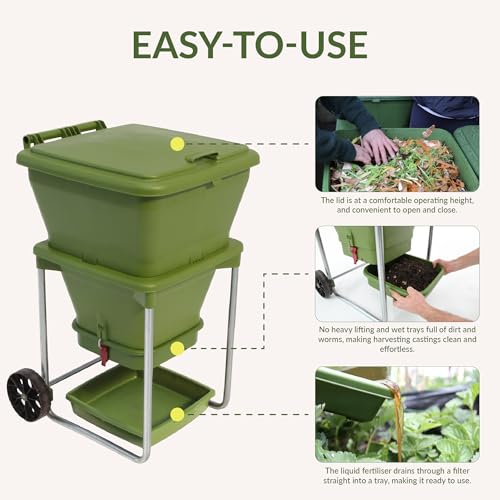
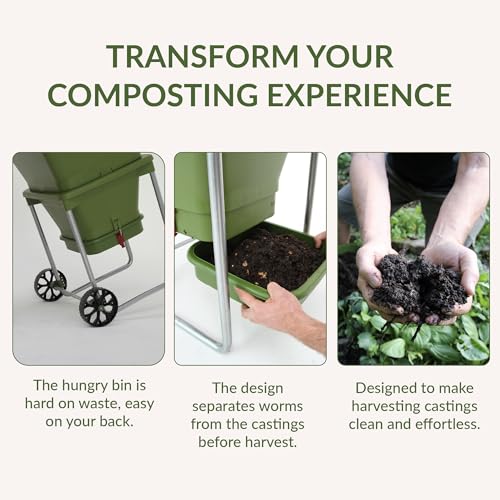
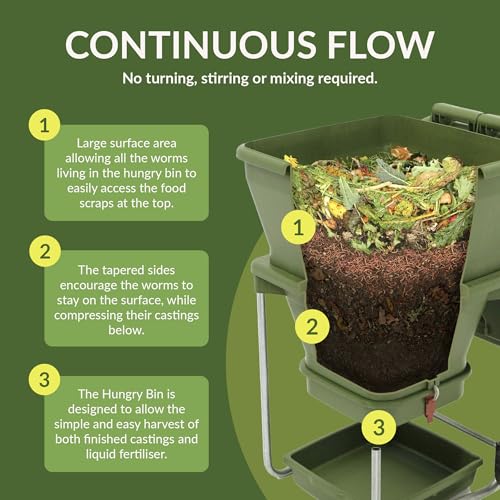
The Hungry Bin Worm Farm is a 20-gallon, continuous flow vermicomposting system designed for indoor/outdoor use. It processes up to 4 lbs of organic waste daily, producing premium worm castings and liquid fertilizer. Made from durable, UV-stabilized polypropylene, it offers odor-free, low-maintenance composting with a space-saving cylindrical design perfect for eco-conscious millennials aiming to reduce waste and boost plant health effortlessly.


| ASIN | B01CRJGUOG |
| Best Sellers Rank | #300,772 in Patio, Lawn & Garden ( See Top 100 in Patio, Lawn & Garden ) #175 in Outdoor Composting Bins |
| Brand | HUNGRY BIN |
| Capacity | 80 Liters |
| Color | Green |
| Customer Reviews | 4.5 4.5 out of 5 stars (315) |
| Is Discontinued By Manufacturer | No |
| Item Weight | 27 pounds |
| Item model number | TBH0001-FBA |
| Manufacturer | HUNGRY BIN |
| Material | Polypropylene (PP) |
| Product Dimensions | 24"L x 26"W x 37"H |
| Shape | Cylindrical |
L**I
Instructions were easy to follow unless you are like me who likes ...
Ordered mine on Sunday and arrived yesterday and I assembled it today. The parts look and feel very well made. Instructions were easy to follow unless you are like me who likes to jump ahead. I put the latches front and back instead of on the sides so I had to remove the top from the bottom part and the bottom part from the stands. The whole thing is easy to disassemble if you have to. I bought the worms from a local seller and picked up a bag of compost from Home Depot today which I mixed with coir and my compost is up and running. I put it under our covered patio which gets sun in late afternoon. To protect it from the sun and prevent heat build up, I used the box it came in to cover the bin around and the top and bottom loose cardboard went on the lid. I can't wait to harvest my first compost. 7/16/2018. Update: It has been four months since I started using my bin. It has been very useful in that it's big enough for the kitchen scrap we have. My worms have multiplied a lot. My only complaint is that when I collect compost that falls underneath, which is mostly the compost that I first put in at the start, there are worms in it. I don't know why. I thought red worms stay only at the top. The way I separate the worms from the compost is to put the compost in one of the composting trays that I have (similar to worm factory) with holes on the bottom. I put a bunch of kitchen scrap on top of the bin and then put the tray on top of that. I keep the lid open to let light in. Since the worms don't like light, the worms in my collected compost go down to the scraps. The collected compost also doesn't have food for them so they go after the scraps underneath the tray. This might be a bit of extra work but it's worth the effort and it's not really a big deal to me. 7/20/2018 Update: Just collected today a lot of compost that finally looks like has a lot more worm compost in it than the ones I collected before. I can tell because it has crushed eggshells in it which means it’s the layer with kitchen scraps, not the store bought bagged compost. As you can see, there are worms in it. As I explained in my first update, with light (lid opened) and fresh kitchen scraps underneath the tray, the worms will work their way down. When all the worms are gone, I can use the compost. 12/9/2018: This past summer, when it got hot, I relocated the bin under our covered patio where the sun doesn't hit it. When it got really hot, I kept the lid opened for a while and a rat was able to get inside. I think it ate a lot of worms (I read that rats do eat worms) because I noticed that there were less of them. So I took a metal window screen and covered the opening with it and placed a piece of heavy wood 24 inches long by 6 inches wide and one inch thick on front of the opening to make sure a rat doesn't try to go inside. Then I put the lid down. I noticed then that when I removed the wood, some worms were still crawling to the screen and lid. I was thinking that maybe they were trying to escape because they needed more air. When I placed the wood back, no worms were trying to escape. Now my worms are very happy and growing fast that I see clumps of them. 7/25/2019 Update: It has been over a year since I bought my Hungry Bin and I'm still loving it. Tried all other compost bins and this is the best. The bin has so many worms that they crawl all the way down to the collection tray. I remove them by exposing them in the light forcing them to crawl on the bottom of the pile and then scrape off the top which is free of worms. The collected worms go back in the pile. I stopped using the tray to separate the worms (I sold my vermihut). I still put a metal screen on the opening to give the worms ventilation and put the lid partway down. When it's too hot, I keep the door all the way up and placed boards on top (with gaps in between) to keep rodents from lifting up the screen. To keep the compost odorless, I keep a balance mix of green and brown waste by mixing in some dry brown leaves once in a while.
J**E
I use outside, it works very well (relatively maintenance free, doesn't smell)
I've had this for about a year and a half now. It works very well. I definitely would not have the ambition to deal with a tray type vermicomposter that required swapping things around. I keep my Hungry Bin outside (in the shade under a deck). The biggest drawback to that was that somehow the Black Soldier Flies (aka fat little maggots) did somehow make their way in when I only used the plastic top. I've found that a couple sheet layer of newspaper under the top works well to minimize that infiltration (and seems to keep the worms happier in all types of weather). The Hungry Bin does not smell at all and keeps up with the kitchen scraps (FYI we are big juicers in our household) just fine. I also have an envirocycle composter that I use for the random garden detritus (that is not a 5 star product IMO, but it does work okay as a convenient and attractive dump for garden waste inside the garden fence -- set up on top of 4 cinder blocks to drain the liquid directly into a container underneath). A useful tip if you are keeping the Hungry Bin outside (recommended, IMO, there are a variety of critters that seem to be in this worm-centered ecosystem) is to get a grill cover, shop light with an incandescent bulb, and a thermal switch to kick in when below freezing (and the shipping box opened up as a "winter coat" if you still have it). A 60w bulb gave me about a 20 degree bump in temperature -- i.e. good to 12 degree outside temp, a 100w about 32 degrees -- good to a 0 degree outside temp). The first winter I did this and it all worked just fine. This past winter I had a lot of other stuff going on and I got lazy (partly an experiment...) but I did not hook up the shop light. It was well-below freezing for over a month and the worms did NOT survive. The worms are restocked now and doing just fine again. Hungry Bin is a good, easy solution for not wasting valuable organic kitchen waste in my experience.
D**S
Expensive but amazing
A**.
Worked great. Worms are happy and this thing catches the "worm tea" aka liquid gold. Good stuff.
M**R
An sich ein sehr gutes Produkt, leider sind die vom Hersteller eingestanztenLuftlöcher im Deckel der Tonne zu klein. Die Würmer bekommen somit zu wenig Sauerstoff und ergreifen die Flucht. Bei offenen Deckel gibt es kein Problem. Die ersten drei Tage ließ ich die Tonne mit geöffneten Deckel unter dem künstlichen Licht stehen, so dass die Würmer sich an ihr neues zu Hause gewöhnen können. Danach verschloss ich die Tonne mit dem vorgesehenen Deckel und die Wurm Flucht setzte sich in Gang. Schließlich öffnete ich den Deckel wieder und ließ das Zimmerlicht wieder brennen. Die Wurmflucht hatte wieder ein Ende. Aber das konnte es ja nicht sein, ich kann ja nicht 365 Tage lang das Licht brennen lassen, also musste eine andere Lösung her. Ich machte mich im Internet schlau. Anfänglich dachte ich den Würmern wäre es zu trocken, somit übergoss den Bio Müll zwei Tage hintereinander mit jeweils 500 ml Wasser. Tatsächlich krochen keine Würmer aus der Tonne. Nun dachte ich, ich hätte das Problem gelöst und schloss den Deckel erneut. Am nächsten Tag befanden sich wieder Würmer auf dem Fußboden, die durch die Ritze zwischen Behälter und Deckel flohen. Nachdem ich den Deckel wieder öffnete und alle Würmer in dem Biomüll setzte, war wieder Ruhe. Stundenweise versuchte ich ein Experiment: ich ließ die Tonne ohne Lichtzufuhr aber mit geöffneten Deckel stehen. Alle zwei, drei Stunden schaute ich nach, und erstaunlicherweise befand sich kein Wurm auf der Flucht. Schließlich führte ich dieses Experiment eine ganze Nacht durch und war erfolgreich, seitdem der Deckel geöffnet ist, aber in einem dunklen Raum steht, will keiner der Würmer mehr abhauen. Bereits beim Zusammenbau fielen mir die kleinen Löcher im Deckel des Herstellers auf. Ich dachte, na, ob das für ausreichend Luftzufuhr ausreichend ist? Da das Produkt aber sicherlich ausreichend getestet wurde, bevor es in den Handel ging, machte ich mir hierüber keine Gedanken mehr. Ich werde nun in den kommenden Tagen mit dem Bohrer weitere größere Löcher in den Kunststoffdeckel bohren. Auch habe ich bei Amazon noch ein Moskitonetz für Bio Tonnen bestellt. Da es mir aber zu umständlich ist, dieses immer abzunehmen, um den Müll einfüllen zu können, werde ich mich für die Bohrlöcher im Deckel entscheiden. Auch finde ich es sehr schade, dass die Betriebsanleitung für die Erstanwendung nur in Englisch beigefügt ist. Hier wäre es sicherlich sinnvoll, weitere Sprachen mit aufzunehmen. Aufgrund der beschriebenen Defizite erhält das Produkt von mir, einen Stern weniger. Ansonsten finde ich das Produkt genial, hochwertig und einfach im Aufbau. Gerne hätte ich die Antwort des Herstellers auf mein angesprochene Problem mit den Luftlöchern gewusst. Vielleicht habe ich Glück und Amazon meldet sich bei mir diesbezüglich. Ansonsten scheinen sich meine Würmer mittlerweile wohl zu fühlen. Nach einer Woche tritt bereits Wurmsaft aus. Hierzu füge ich euch noch Bilder und ein Kurzvideo bei.
M**S
I am Very Happy with my Hungry Bin. I was questioning any kind of worm farm and the ability to take advantage of all aspects. I am all about reduce, reuse and composting so this concept of composting, while using the castings for my garden and even the liquid at the end was a great idea, if it worked. I tried this idea in a Rubbermaid container and actually had a results. This convinced me that with a great system it could really worked. It does. I started in April and have had plenty of nutrient rich liquid and castings for my vegetable garden. I am preparing for the coming winter and will be taking the bin in my workshop and not even worried about any smell. I guess if done right there is very little to none. I will also say that the customer service from Scott B. was fantastic and quick. This was worth the purchase for me.
B**N
Best worm bin out there!
Trustpilot
1 month ago
4 days ago


