
🚀 Own the future of robotics—build, code, and control your smart tank like a pro!
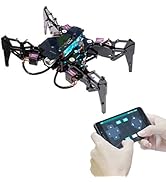
The Adeept RaspTank WiFi Wireless Smart Robot Car Kit is a comprehensive STEM educational kit designed for Raspberry Pi enthusiasts. Featuring a 4-DOF robotic arm, OpenCV-based object tracking, real-time WiFi video transmission, and customizable RGB LEDs, it offers an immersive hands-on experience in robotics and programming. Compatible with Raspberry Pi 4/3B/3B+/2B models, it includes detailed assembly instructions and beginner-friendly Python code, making it ideal for learners aged 12 and up seeking to elevate their tech skills.


| ASIN | B085C6Q48P |
| Assembly Required | Yes |
| Batteries Required? | Yes |
| Batteries included? | No |
| Best Sellers Rank | 202,978 in Toys & Games ( See Top 100 in Toys & Games ) 304 in Toy Robots |
| Colour | Black |
| Customer Reviews | 3.5 3.5 out of 5 stars (261) |
| Date First Available | 1 Mar. 2020 |
| Educational Objective(s) | Programming and Robotics Skills |
| Item model number | ADR013 |
| Manufacturer recommended age | 12 years and up |
| Material Type(s) | Acrylic, Polycarbonate |
| Number of pieces | 4 |
| Product Dimensions | 16.08 x 6.3 x 22.89 cm; 950 g |
| Scale | true size |
| tech_spec_battery_description_toys | Lithium-Ion |
M**N
Great Little Robot Kit - Dont expect it to bring you a beer/coke
All in all, a great little robot with some nice electronics. Entertained us for about a day and half to build it. - Ignore the flimsy instruction sheet that comes, and download the pdf with the full instructions https://www.adeept.com/video/static1/itemsfile/Tutorial_12-11.pdf -Download the full raspian image (gui and all) as the lite one doesnt work (missing some packages) you can setup the wifi network using the file suggested on the instructions direct to the sd card to avoid keyboard/monitor being needed - On Windows use notepad++ to write the wifi file to sd, normal windows notepad puts line feeds in and while it looks ok in windows, the pi will not read it Their script that downloads everything and sets it all up works perfectly if you use the full gui raspian image attach the servo cables as instructed right at the start to get the pi working and allow it to set the servos to centre. Dont worry about the led light wiring until the diagrams later which show it explicitly we snapped a servo collar piece when removing it from the laser cut sheet - dont worry there are 3 extra ones provided When assembling the final side pieces (large plates) turn robot on its side, to allow you to balance the nut in the opening to screw then on otherwise nut will drop out and inside the robot, otherwise you will need about 5 hands. -Right motor is motor 2, left is motor 1 - insert cables at the same time as you attach all the servos during final nightmare assembly. pass the servo cables through the top plate before connecting then to the board or you will have to undo them from the board. - Our camera had the ribbon at the bottom rather than the top, else image is upside down its plenty long enough to bend gently over the top of the camera bracket - Use the servo extender cable for the gripper servo or the wires are not long enough to assemble the robot fully cable management is a nightmare, especially care with the camera ribbon as its fragile, and tucking the servo cables down the sides of the pi to allow the top place to be placed in the right place If you find the motors drive really nice, but the servos are really slow and jerky, check one of them isnt jammed against the end of its travel - the servos will use all their strength to hold position regardless of whether the joints allow it, and will use all the servo power - shut off robot and check all servos can move by hand (you cant do this with the power on as they hold fast in place) Elbow and shoulder motors seem blended together as there is no separate elbow control buttons, this still works though but you cant manually direct the elbow motor. It cant really grip anything substantial, so forget having it bring you a beer. - Arm up/down seems to be the camera/ultrasonics on ours, 'hand up/down' is the shoulder and elbow - The collars that attach the driven wheels to the motors have their holes cut too large for the spindle on the motors, resulting in it being hard to centre then on the shafts, they could have made the hole smaller and only needed one grub screw, so the driven wheels look a little buckled when they turn - not a major issue. - Dont forget that the SD card is buried deep within the bowels of the robot, you wont be able to get it out after assembley! Software is actually quite advanced, there is scope here for hours of development and tweaking, on a great little fully featured platform.
S**H
Absolutely rubbish
I wouldn't buy this if I were you. The circuit board to plug the camera in is missing. I paid a lot of money for this and built a lot of it only to find out it's got parts missing. I'm sending it back.
J**N
Should be great, but overstretched
On the face of it this kit is great, it takes a while to put together but following the downloaded pdf, with a few common sense changes I got a working robot. That's where it ends. It's too small for what is packed in. The case is packed with wires, including a ribbon cable for the camera, so there's no ventilation, my Pi3 overheats. Also because of the cable, the front camera servo frequently gets snarled up and doesn't work. Very quickly two of the servos burnt out, not lifting anything other than the weight of the arm, but the connections for these is at the base of the robot, so to replace them, the whole robot has to be disassembled. That's when I gave up on the base kit, I'm remaking the main body 2cm wider to provide space and ventilation, and replacing the basic small servos with better ones. Also fitting servo extension cables so it doesn't have to be disassembled in future! The good side to this robot, is that the acrylic body is very well cut, the Adeept Robot controller card is excellent and the software well thought out, though the OpenCV instructions are quickly sabotaged by the advances in software. As a basic kit, it's not very good and needs an enthusiast to make it successfully, needs better servos and more internal space.
A**H
Great product but not easy to build or get working - please read my review below before purchasing !
Ok, where shall I start …… first thing, don’t buy this raspberry pi robot as a birthday or Christmas present for little Jonny (or Joanne) if they expect it to be assembled the same day. We bought the raspberry pi robot for our grandson on his 11th birthday. He already had a raspberry pi and had some basic understanding of it. With some excitement we started to assemble the robot. It soon became obvious that you need the skills of a watchmaker, mechanical engineer, electrical engineer and a computer scientist ! Unfortunately I only met one of these critiria. In all, it took many hours (20+) over several weeks to build the robot. With the robot fully assembled, we needed the help of a computer scientist (my son) to load the software into the raspberry pi to make it all work. The finished product was quite impressive although we haven’t explored all the features of the robot. Personally I would say that this product is suitable for anyone with the relevant skills (see above) but not for an 11 year old child! Here are a few things to consider if you decide to purchase the robot: 1. The instructions are in English but probably translated from Chinese. 2. Not immediately obvious, but you need to remove the protective cover from all the plastic parts before use use them. Not easy, but we found that with a small flat bladed screw driver you can scratch away a small area of the film away and this will help to remove the rest of the film. 3. There are some fiddly nuts and blots to assemble. You will know them when you have to fit them. Tip - use some bluetac attached to a small flat bladed screw driver and attach the nut to the bluetac and use the nut attached to the screw driver to lower the nut into position. 4. Servo motor connections - I couldn’t find how the connect them to the circuit board. Best way is to connect them one at a time and work out which set of pins on the circuit board drive which motor. 5. Loading the software on the raspberry pi - get a computer scientist to do this for you 😀, Thanks for reading. Stumpgrinder.
R**F
Le produit est de très mauvaise qualité. Une pièce principale s'est cassée facilement lors du montage. Il y a très peu de place pour le passage des cables et causent beaucoup de pression sur l'ensemble. Le vissage des éléments est complexes et demandent beaucoup de doigtée.
C**N
Petit robot très bien fait, assemblage un peu délicat sur la fin mais rien de méchant. Le choix de la techno (raspberry/python) en fait un outil très pratique et intuitif pour programmer en python. Pour les moins patients, une webapp est dispo pour le piloter directement. Les commandes sont réactives, à l'instar des capteurs. Attention, prévoir l'achat des batteries et de la carte Rpi en plus. Produit très satisfaisant et équipe très à l'écoute en cas de problème !
F**O
Was fun to build! Looking forward to purchasing more!
G**I
L'oggetto è BELLO e (alla fine) FUNZIONA BENE ... MA: 1. le istruzioni non ci sono: sulla scatola è indicato di cercarle nel file "detail-34.html" sul sito adeept.com (nella sezione "Learn"), ma ... il FILE NON C'E' e, al suo posto OCCORRE SCARICARE "RaspTank Smart Robot Car" (ma nessuno lo dice); 2. (se non siete dei modellisti esperti) ricordatevi di azzerare i servomotori PRIMA di montarli (è scritto chiaramente nelle istruzioni ... ma alla fine, DOPO le dettagliate istruzioni per il montaggio dei componenti e per l'assemblaggio finale); 3. quando avrete montato tutti i componenti, armatevi di TANTA PAZIENZA, perché l'assemblaggio finale (in particolare riguardo a dove far passare e dove mettere i cavi, in totale assenza di istruzioni) è un vero incubo, per non parlare del fissaggio delle pareti del RaspTank (i piccoli dadi, necessari per bloccare le viti di fissaggio, cascano immancabilmente all'interno quando si cerca di "abboccarli" alla propria vite ... e ci sono 6 coppie dado-vite); 4. per arrivare in fondo, è FONDAMENTALE conoscere bene il Raspberry Pi e SOPRATTUTTO il sistema operativo RASBIAN perché vi può capitare (come a me) che il moto avanti ed indietro del RaspTank siano invertiti (la possibilità è segnalata nelle istruzioni ...) e quindi DOVRETE MODIFICARE il PROGRAMMA nascente di Adeept (che avevate precedentemente installato nel Raspberry Pi): per farlo dovrete collegare il Raspberry Pi ad un monitor, ad una tastiera e ad un mouse ... e alimentarlo; 5. ... vi occorre comprare anche un Raspberry Pi, con una scheda micro SD ... perché NON SONO COMPRESI NELLA SCATOLA.
M**I
Helt olämpligt att köpte detta som fattas Matherbordet Hjärnan till robotten
Trustpilot
2 weeks ago
2 weeks ago


