We remain fully operational. Our teams are working around the clock to ensure your deliveries continue safely.

DOWNLOAD THE APP


Customer Services
Copyright © 2025 Desertcart Holdings Limited
DOWNLOAD THE APP

🚀 Elevate your DIY game with the ultimate Raspberry Pi 4 starter kit!
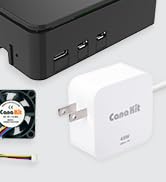
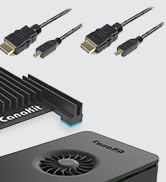
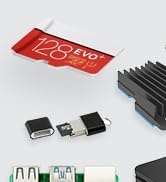
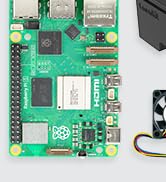
The CanaKit Raspberry Pi 4 Starter Kit combines a powerful 1.5GHz 64-bit quad-core CPU with 2GB LPDDR4 RAM and a pre-loaded 32GB EVO+ Micro SD card, all housed in a sleek high-gloss case featuring a low-noise fan and heat sinks. It includes a 3.5A USB-C power supply with noise filter, a 6-foot 4K-capable display cable, USB-C PiSwitch, and essential accessories, delivering a ready-to-use, all-in-one solution ideal for media centers, coding projects, and professional applications.


| ASIN | B07V2B4W63 |
| Best Sellers Rank | #11 in Single Board Computers (Computers & Accessories) |
| Brand | CanaKit |
| Built-In Media | Raspberry Pi 4 Model B, Pre-Loaded 32GB EVO+ Micro SD Card, CanaKit Premium High-Gloss Raspberry Pi 4 Case with Fan Mount, CanaKit Low Noise Bearing System Fan, CanaKit 3.5A USB-C Raspberry Pi 4 Power Supply with Noise Filter, set of Heat Sinks, Display Cable, USB MicroSD Card Reader, CanaKit Quick-Start Guide, CanaKit GPIO Reference Card, CanaKit USB-C PiSwitch |
| Compatible Devices | Cameras, computers, game consoles, smartphones, microcontrollers, printers, keyboards, and speakers |
| Connectivity Technology | HDMI, USB |
| Customer Reviews | 4.8 out of 5 stars 10,432 Reviews |
| Included Components | Raspberry Pi 4 Model B, Pre-Loaded 32GB EVO+ Micro SD Card, CanaKit Premium High-Gloss Raspberry Pi 4 Case with Fan Mount, CanaKit Low Noise Bearing System Fan, CanaKit 3.5A USB-C Raspberry Pi 4 Power Supply with Noise Filter, set of Heat Sinks, Display Cable, USB MicroSD Card Reader, CanaKit Quick-Start Guide, CanaKit GPIO Reference Card, CanaKit USB-C PiSwitch Included Components Raspberry Pi 4 Model B, Pre-Loaded 32GB EVO+ Micro SD Card, CanaKit Premium High-Gloss Raspberry Pi 4 Case with Fan Mount, CanaKit Low Noise Bearing System Fan, CanaKit 3.5A USB-C Raspberry Pi 4 Power Supply with Noise Filter, set of Heat Sinks, Display Cable, USB MicroSD Card Reader, CanaKit Quick-Start Guide, CanaKit GPIO Reference Card, CanaKit USB-C PiSwitch See more |
| Manufacturer | CanaKit |
| Memory Storage Capacity | 2 GB |
| Mfr Part Number | 99294 |
| Model Name | Pi 4 |
| Model Number | 99294 |
| Operating System | Linux (e.g., Raspberry Pi OS, Raspbian) |
| Processor Count | 4 |
| RAM Memory Installed | 2 GB |
| RAM Memory Technology | LPDDR4 |
| Ram Memory Installed Size | 2 GB |
| Total Usb Ports | 4 |
| UPC | 682710992945 |
| Wireless Compability | Bluetooth |
D**L
Super easy and quick assembly. Very cool product!
First of all, I'm brand new to Raspberry Pi. I loved the CanaKit Raspberry Pi kit. I had everything I needed to get up and running fast, except for a mouse and keyboard, which is clearly indicated in the description, so I was ready to go when the kit arrived (which it did VERY quickly!). INITAL HARDWARE SETUP The design of the included case did not even require one single screw. The top and bottom of the case "snap" off from the middle easily and the board drops into place onto the bottom plate. Be sure to attach the three heatsinks on the chips and the wire connectors for the fan before snapping it all back together if you are going to use them (which I strongly recommend). It's much easier to attach them with the full board exposed. Then you snap the top and bottom back on onto the middle and you're done. It would have been a tiny bit faster to assemble than it was but I had to search the internet for the right pins on the board to connect the fan to. The two rows of pins were not numbered on the board nor referenced in the quick guide included. It took like 10 seconds to verify the board pinout and another 10 seconds to find which pins the fan connects to. There were lots of videos and diagrams available to help, including videos specifically for this brand and model. Since the fan has two power/speed options I wanted to be sure I was connecting to the right pins. I chose the higher power/faster speed. Some review comments mention more noise with the higher speed but I found the "noise" to be almost silent, even at the higher level. I can save you a bit of time on the fan pinout bit. The row closest to the outside of the board are the even numbered pins. Since this is a computer (one's and zero's) that row starts with 0, then 2,4,6, etc. The row towards the inside starts with 1,3,5,7. The numbers go higher as you move from the outside edge to the inside along the row. For the higher fan speed, connect the red wire to pin 4. For the lower fan speed, connect the red wire to pin 3. The black wire is ground and always connects to pin 6. Easy peasy once you know! Overall this part took about 10-15 minutes. INITIAL OS SETUP The pre-loaded NOOBS (New Out Of Box Software) was fast in helping choosing which operating system and what options you wanted. Choosing other options like new password. time zone, wireless and keyboard went fast. After the OS booted up it took a while to check for and install any needed upgrades (perfectly normal and expected for any OS). If you have a 5G wireless wifi, be sure to connect to it (or use an ethernet cable) to save download times for OS and application software upgrades that may be needed. Overall this part took about 30 minutes including downloads, then it rebooted and started working perfectly. CONS The kit would be perfect if it included pin out instructions for the fan and a little more clarity on installing the heatsinks. That's the only parts that caused me any delay in putting it all together. SUMMARY Great kit and good price. It's possible that searching for the individual parts might have save a few pennies or dollars, but having almost everything from one manufacturer in one box, assured me that everything would work together and there would be only one place to go if troubles appeared. I would absolutely recommend this kit if you are getting started in the PI world, and even if you're more experienced. This kit is GREAT!
A**R
Great for making a media center
Excellent product and kit. Very easy to put together. I flashed LibreELEC to the Micro SD card that comes with the kit and made a media center.
F**R
Nice starter kit for my first Pi
Got me up and running quickly. The price varies but was a good value when I bought it for sure. I think the logo in the top is cool for ventilation but could be more efficient if the logo was either bigger or eliminated in favor of better flow for the fan attached to the case. It is working well for my ADSB feeder for the network. The WiFi and Ethernet seem sufficient. The board fits together nicely. Documentation is lacking a little bit but it wasn’t hard to figure it out but there is some helpful information if you have never set up a Pi before.
M**D
Update & Upgrade from Bridger General (1 Star) to General of the Army (5 Star)!
An update and upgrade from Bridger General (1 Star) to General of the Army (5 Star): Shortly after posting my review I was contacted by CanaKit. I went over the product review with them in addition to the only two options I can think of that I didn’t do were changing out the micro HDMI to standard HDMI cable that came with it, and a different make/model TV/monitor. At that point I thought maybe there wasn’t enough power coming out of the micro HDMI connector to the stand HDMI connector from the Pi 4 B to display an image blaming fault on the power supply as state in my review. After going through all the troubleshooting steps described in my Amazon review, and in addition to the ones just explained I felt that there wasn’t anything a technical support technician could do that I didn’t already do but willing to make another “go of it” because there has been a lot of exciting projects on YouTube about the Raspberry Pi 4 4GB. They sent me a new Raspberry Pi 4 4GB Starter Kit - 4GB RAM for me to try out. I received the kit Monday morning on the 4th. Again I followed the instructions to the letter supplied in the kit, putting the Pi together and setting it up correctly and taking my time. The basic same problem as before! No activity and nothing was displayed on the screen (monitor/TV)! I didn’t brother going through the standard troubleshooting steps again because I felt it had to be something entirely different. I decided to try using an old VIZO monitor/TV I had laying around the house instead of my newer Seiki 24-inch TV/monitor I had been using before contacting CanaKit. This time it worked flawlessly! As it turned I did a careful examination on both connectors on each monitor and notice that when I connected the HDMI cable to the newer Seiki 24-inch TV/monitor it wouldn’t fully seat like all the other HDMI cables would, including the one that came with my old Pi 3 B+. I would suggest to anyone having similar issues to first check your connectors on the TV/monitor you will be using before returning the device for a refund. Thanks CanaKit, very thoughtful and kind of you to go out of your way to do this, and much appreciated in helping me getting this amazing device up and running! I will be looking forward to the next upgrade soon! Very Disappointed, My Heart is Broken! Was looking forward to using this amazing device as a second desktop PC. Problem: the red power light illuminated on the board, but there is was no other activity and nothing was displayed on my screen (monitor/TV). I checked to ensure that the Micro-SD card was fully seated all the way in the Micro-SD card slot of the Raspberry Pi 4 B board itself, ensured that the Micro-SD card is properly formatted with compatible software, Raspbian Buster the official operating system (OS) for all models of the Raspberry Pi by downloading it and installing it on a Micro-SD card or use the NOOBS Micro-SD card that came with the kit which is the easy installer for the Raspbian OS. I tried booting first from the Micro-SD card with NOOBS installed on it and then using a 32GB Micro-SD card with the the new Raspbian Buster OS for the Raspberry Pi 4 B the new standard version of Raspbian OS, and for all earlier Raspberry Pi models too. Both with no success but both of these Micro-SD cards will work on my old Raspberry Pi 3 B+ that I purchased from Amazon April 1, 2018 and is working great so far! Finally, I checked to see if the device’s EEPROM had become corrupted (rare but possible) by following the recovery instructions on the Raspberry Pi 4 B’s website by removing the Micro-SD card, disconnecting the device from power, then reconnect it. If the green LED does not flash then the EEPROM will need to be reprogramed but the green LED was flashing. Returned the item for full refund. Maybe i'll purchased another one again but not sure when. Might wait until they come out with a Raspberry Pi 4+ next year. I suspect it might be the power supply that comes with the kit and is not enough to power the device. What else could it be?
D**.
Good starter Pi kit
Overall, this is a pretty good kit for the Pi 4. It includes all that you need, plus a few nice to have extras like the in-line power button. As you may expect from the listing, you'll need your own keyboard, mouse, and monitor. The big brand-name stuff (PI and SD card) in the kit are excellent, and works as you'd expect. The case is a glossy plastic, easy to take apart, has good airflow, and a little gap at the top so anything connected to the GIPO can easily exit the case. The case fits together snug and secure, but doesn't actually latch or click in place. The other CanaKit branded stuff was a little hit-or-miss though. There aren't any instructions included in the box about how to fit the Pi into the included case, which components the heat-sinks should go on, recommended fan mounting direction, or where to plug the fan on the Pi itself. I've set up Pi's before, and worked with airflow in PC chassis', so I was able to figure it out, but a beginner might have to do some careful trial-and-error. The HDMI cable worked as expected. My only gripes is that the mini-HDMI connector feels a little bulky, and I'm just not a fan of single-use-case cables like this one (HDMI->Mini-HDMI). An adapter dongle would have been better, but this is fine and gets the job done. The USB SD card reader was completely non-functional for me, so I had to resort to another reader I was able to dig out storage. Also, the slot in the reader grips the SD card a much tighter than I'd like, making it extremely difficult to remove my hard, and I needed to use an extra tool to get the card out. Not a fan of this since if you use a little too much force by accident, you can damage the card. Overall, a good kit to get started, and includes all the essentials to run a Pi plus a couple nice extras. Just be careful of the SD card reader!
S**S
Nice mini-computer
This was very easy to assemble, and the design is pretty good. I was able to be up and running in about 30 minutes. from unbox to surfing the web. I plan on buy a few more for various projects.
Y**A
Awesome little linux box...
I finally got my hands on a Canakit after waiting nearly two years for one due to the pandemic supply-line shortages. I had to return the first one back to Amazon due to a defective WiFi. The replacement one is working great without any noticeable issues. I'm using it to run pi-hole and as a server for the UniFi controller. I access it via SSH & XRDT, using putty &/or windows 10 remote desktop. Once resbian is installed & configured, mouse, keyboard, and monitor are not necessary. My next purchase will just be the board, a cheap case & power supply to save money because in my humble opinion the kit is a waste of money because some of those extras <cables > are unnecessary after the initial installation. Thus, the kit is an overkill. Recently, I experienced a corrupted microSD card & wasted time formatting & preparing the new microSD for a new image. I didn't know you could just insert the blank microSD & use network installation option instead. This method is so much easier vs manually downloading & creating a new resbian image, which is time consuming. Installing the UniFi controller on Raspberry Pi 4 was lengthy & a tedious process... it was so frustrating 😤. There are so many old & useless information on the web when you use Google on how to install the UniFi controller on Raspberry Pi 4. Some of those websites sent me to that proverbial rabbit hole. To avoid going to that rabbit hole like me... First, you must use the 64 bit version of the Rasbian OS because Ubiquity no longer supports the 32 bit version. Second, you'll see many useless websites still pushing obsolete info if you use Google for help, the website with the current info is..."PiMylife", hopefully Amazon will not block me for listing it. I'm new to linux. I'm learning useful new linux commands to efficiently operate this amazing little machine 😍. It runs quietly even with the fan running, somewhat a little warm & relatively nimble. This credit card sized PC is highly recommended!
L**Z
GREAT starter kit for dev and non dev
Been using this bad boy for six months now to automatically shut down my server when it's not in use, and let me tell you, my electricity bill is thanking me. If you're looking for a smart way to save some cash and automate stuff, this is it. What's killer about this kit is that it literally comes with everything you need. No hunting around for extra bits and bobs. And the power adapter? Huge win. Trust me, you don't wanna be stuck trying to find the right one. The parts themselves feel solid, not like some cheap plastic junk. You can tell they put some thought into this. Whether you're a hardcore developer or just someone who likes to tinker (like me!), this kit is super easy to get up and running. The assembly was a breeze, no complicated steps or anything. Honestly, if you're even thinking about getting a Raspberry Pi, just grab this kit.
Trustpilot
1 week ago
3 weeks ago