


Racor - PHL-1R, Garage Ceiling Storage Rack Lift
Product ID: 267300
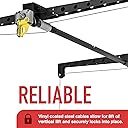
📏8 ft vertical lift range
⚙️250 lbs max lift capacity
🛠️Adjusts to angled ceilings
🚀 Elevate your storage game—lift heavy, store smart, live clutter-free!
The Racor PHL-1R Garage Ceiling Storage Rack Lift is a durable, adjustable steel platform that creates 16 square feet of overhead storage. It supports up to 250 pounds, raises and lowers smoothly up to 8 feet via a crank or drill attachment, and securely locks in place. Designed for angled ceilings and heavy-duty use, it’s the ultimate space-saving solution for professional-grade garage organization.


| ASIN | B0009I8AO6 |
| Batteries Included? | No |
| Batteries Required? | No |
| Color | Black |
| Customer Reviews | 4.6 4.6 out of 5 stars (1,819) |
| Date First Available | November 1, 2000 |
| Finish | Steel |
| Included Components | Add-on Units |
| Is Discontinued By Manufacturer | No |
| Item Package Quantity | 1 |
| Item Weight | 47.2 pounds |
| Item model number | PHL-1R |
| Manufacturer | Racor |
| Material | Steel,Nylon |
| Mounting Type | Ceiling Mount |
| Part Number | PHL-1R |
| Product Dimensions | 48 x 6 x 24 inches |
| Size | Pack of 1 |
| Special Features | Durable |
| Style | Adjustable,Unique |
| Warranty Description | 1 Year Limited |
C**W
Great product! Shelf space and holds my Jeep hardtop underneath!
This is a great product. I highly recommend it for its intended use, as well as for its use in my "modified" fashion (that I will explain below). First of all, if you have the space in your garage to install one, you should, because we all know how full a garage gets with extraneous items. This way, you can store the off-season items you don't need, and rotate it out for things you do. That's what most people do. For me, I wanted a place to store my jeep soft top parts when I had the hard top on. These parts are fragile and expensive, so I wanted them safe and out of the way. As a bonus, I also found a way to hang the hard top, but I'll get to that later. First, the installation. You "could" conceivably do this alone, but it would be a challenge. Better to get a friend (or two) to help. I had my father in law and a buddy, and it went up in a snap. Assembling the shelf is a snap. Where it gets tricky is installing the mounts into the ceiling joists. Make sure you've got a stud finder. The mounts need to go into the studs with 10 screws per mount, evenly spaced. So if you want to install it in a particular orientation and the joists run the other way, you'll have to put up 2x4s first, on the ceiling, and then install the mounts. Luckily for me, the joists ran the correct way for me to install my Racor, which had to be oriented with the winch mechanism on the side (so that I could pull my jeep in and still access it). Think about that orientation before you start installing. Anyway, having a friend help you by holding the mount as you drill pilot holes and insert the screws is very helpful. Went up quick that way. Make sure you do drill pilot holes first, else it will be a lot more work. Also, make sure you measure correctly when installing the second mount, so that it lines up properly. Once the mounts are installed, snaking the cables and attaching to the shelf is no problem. The winch mechanism can be used by hand, but you'll get a real workout, particularly with a load. A drill works great to automate that task, and I highly recommend it. So, for me, I did some mods. I wrapped the edges of the Racor in pipe insulation to provide padding and weight distribution. Then I wove some cam buckle straps through the flooring, leaving the hooks hanging down the sides. So with these hooks, I can "grab" the Jeep hardtop when I back up my jeep right underneath the Racor. One person can then undo the roof bolts, lift each corner, and hook up the Cam strap. Once all 4 are hooked up, I raise the Racor a few inches, and drive the Jeep out. Then I lower the Racor again, adjust and tighten up the straps, and raise it to the ceiling, giving me Hardtop storage without sacrificing valuable square footage in the garage. Bonus that I can store my Jeep soft top parts on the shelf, out of the way, in the winter when the hardtop is on. You can spend more to buy a "custom" jeep roof system that gives you no other storage, or use this with some mods and have a dual purpose system. The roof only weighs ~125 lbs, so plenty of margin for safety. Highly recommend this versatile product.
M**N
Excellent Product and Excellent Service
I had bought 2 of these nearly 4 years ago and installed them in my garage to save space. I recently purchased another 2 of them. I now have 4 total units spread out across a 2 car garage. They fit perfectly the width of my garage and the high ceiling allows for ample clearance for storage. I use them to store 2 car luggage boxes, 5 rolls of astro-turf that I plan to install later, 3 inflatable kayaks, oars, life jackets and other accessories. I use some tie down strap to keep the objects secured on top so they don't shift and fall down. I have the attachment to use a power drill but I currently use the manual hand crank. The hand crank works well and is smooth operation. The units feel well constructed and sturdy. On one of the units I had a missing part. I emailed support and the customer service lady was exceptional. She sent me the parts manual to me, got the part number from me and immediately placed an order in her system. The process was quick and painless and I had the part delivered to me within a week. Installation was fairly straightforward but I added wood cross beams from Home Depot to make my installation extra secure for load bearing. These are great value for the build and quality. I would get these again.
G**S
Works well - jury still out on the nylon bushing. May want to start with 2x4 for mounting.
This is a pretty good device. I agree with the other posters that Racor has gotten a bit cheaper on the construction, but the only piece I'm concerned about is the new bearing. It is a simple nylon ring, where the previous model had a nice metal bearing. The remainder of the device still seems sturdy enough. This is my second install, and I thought I'd pass along a few things I've learned during my 2 installs. 1) Unless you can see the joists, use a 2x4 and some 5" lag bolts. Every time I've tried to install without using a 2x4 under it, I get a surprise. In my most recent case, the studs are mounted offset in one section, so I don't have a straight line to mount the bracket. That's really annoying when it's the last 3 lag bolts, and you have to take the ENTIRE thing down to re-install. Because of the way it's made you have to mount both on a 2x4. I lost about 3 hours work this weekend starting over. 2) Install the brackets before you install the winder. It's very easy to install after the bracket is on the ceiling, and it reduces the weight SIGNIFICANTLY. If you're doing all this work over your head, the winder is heavy and makes it hard to hold that half over your head reliably. 3) If you have a high ceiling (Which is what makes this item attractive) replace the cables with longer ones. On a 12' ceiling the until will only go down about waist high. That makes it much harder to load heavy items with it swinging all over the place. With longer cables you can drop it all the way to the ground. I bought model 348277 (50' coated cable) from the big blue home store. Good strength rated and vinyl coated. Downside is it adds a little over $36 to the project. I use the excess cable to wrap around about 18 inches from the platform. This helps secure items.
D**A
Works for my heavy duty use, with additional modifications & an explanation of what will happen if you overload or stand on it
This is not much of a review, the other reviewers have covered most of the high/low points well. You'll want to read this if you are considering hoisting a heavy-duty snow thrower, or any other load which is close to the recommended load limits, or going to be a point load, and not spread out over the whole platform. This is a cool product. For one, here is a company willing to sell an inexpensive consumer-grade product with moving parts that is rated to hold 250 pounds above people's heads. I think this company has succeeded tremendously. I needed a platform which would hold my heavy duty snow thrower out of the way in my shed during the off-seasons. My 30" 357cc snow thrower probably weighs 240 to 260 pounds, so it is over the edge of their design parameters. Add to that their restriction that the weight be spread evenly on the platform. Not my snow thrower. I would say 200 pounds of its weight is carried by its wheels, so it has two point loads less than 2' apart of 100 pounds. To accomodate the anticipated overweight cargo, I planned put some thin plywood over the platform to better spread the weight, and to attach a system of extra pulleys and counterweight (5 gallon bucket of ice melt!) Luckily I stood on the platform, and bent it slightly during my initial assembly. (I say lucky, because otherwise I might have bent it worse trying to hoist the snow thrower.) This clued me in to a key design detail that I initially thought was a major flaw, but now realize is intentional. The platform is intentionaly meant to bend if it is overloaded, or has a load which is not spread evenly over the whole platform. If you try to hoist a 250+ pound load without making any changes, the platform will act more like a cargo net with very stiff cables, instead of a platform made of steel rods. I suspect that all four corners might fold upwards, cradling your load in the middle depression. What an ingenious solution Racor has come up with to prevent getting sued by knuckleheads who overload their product. All they have to do is show a jury a photo of the folded up product, and ask the knucklehead why he (its always a he) kept cranking, even after the platform folded in on them. Its sorta like a circuit-breaker, to prevent overloading, without having a catastrophic failure. My guess is that the pulley and hoist mechanism is actually capable of handling 4 times the load, but why risk it? I will describe what I did with this overweight snow thrower though. I beefed up the platform with some old hickory "studs" I had around. (photos included.) Once I hoisted the snow-thrower up (with counterweight system), I looped chain around all four corners, and backed off the Racor pulley/cable system so the dead weight is mostly being sent to the chains. When I need snow thrower next winter, I will crank the platform up again, disconnect the chains, make sure the counterweight system is still working, and then lower the platform. BTW, let me say that this is not hanging in some dorky little mass-manufactured shed. My shed is built more like a house, with 2x4's and rafters. You will see from my photos that I was able to remove one rafter, and sister up the rafters on either side of this opening. This allows me to lift the platform with snow thrower on it almost 6 feet in the air (a good portion of the snow thrower is actually up above the rafters and pulleys and lifting mechanism.) You will note that I had to position the snow thrower on the platform so that the central axle of the Racor mechanism slides into a low area on the snow thrower between the motor and the auger shield. Otherwise I'd be limited to lifting the thing to only a not-so-useful 3-4 feet. You will find photos of the slightly bent platform (from standing on the edge), then photos of the snow thrower hoisted up into the rafters, and finally a photo of the chains loop on one corner. (That's a rusty old garbage can on it in first photos)
K**C
Good product. You can install with one person.
I researched this for a long time before I bought it. Mostly I was worried about the difficulty with the installation. Necessity finally dictated that I give it a try. We were given a 12' artificial Christmas tree that is stored in two huge boxes. These were too heavy and bulky to lift up and down a ladder to store on my Hyloft garage ceiling shelves. I read the instruction and decided to modify it so that I can install this myself. All told it took about five hours but I took my time measuring everything and was being extra careful. The key to a one-person installation is to NOT assemble the arms with the T fitting on the ground. The entire arm assembly is just too heavy to lift overhead and to drill the pilot holes. I first made sure I had an unobstructed part of the garage ceiling, AND that there were studs 48" apart fairly centered within that space. Then using a stud finder, I mapped out the two studs to which I will be installing this. I rough assembled the arms and took the length measurement. From this, I marked where the ends of the assembled arms should be. I used a laser guide anchored and projected down the centerline of the stud I'm working on. I found this very helpful. I started on one end. I took one unassembled arm and lined up the outer edge (end with the pulley) to the mark. Then I used the laser guide to help me keep the arm centered to the stud. This way I was able to hold the arm steady against the ceiling and mark my drill holes keeping them centered. Then I was able to fill my pilot holes using the 1/8" bit as instructed. HERE IS A TRICK--put a tiny bit of liquid dish detergent on the lag screw. You don't have to go nuts. A tiny bit will do. I had no trouble putting these in through the pilot holes using a manual ratchet socket, and not one of these lag screws broke. With the pilot holes drilled, I put up the first unassembled arm with the four lag screws. DO NOT TIGHTEN. Once I felt the lag screw has entered the wood, I gave a few turns. This was enough to keep it from falling. Then I rough assembled the T fitting to the arm with the two little bolts. This allowed me to push it up against the ceiling and mark the two drill holes. Again the laser guide helped me keep the whole thing centered. I took off the T fitting and drilled my pilot holes. Then assembled the T fitting to the arm with the bolts and nuts and loosely anchored into the studs with the two lag screws. Repeat the same with the second arm. Once the entire arm assembly is attached and loosely anchored to the ceiling, I made sure everything fitted together and the placement was correct. Then I tightened all of the lag bolts. Repeat the whole process for the other arm. Although this took more time, there was not one pilot hole that did not match with to the assembly. The rest of the assembly was straight forward per instruction. It took me awhile but it was worth it and I really like how this thing functions. Good luck to you.
P**R
Excellent garage space maker
I've been desperate to increase the storage capability of my garage without losing the ability to park cars in it. I had overhead storage made of 2x4s and plywood, but it was difficult to access and I could never remember what was up there. I came across the Racor Heavy Lift storage rack and thought it was a great idea but the $199.99 list price was more than I wanted to spend, so I looked at designing my own solution. When I saw it on Amazon for $130 (including shipping!) I realized I probably couldn't build a half-baked copy myself for less and bought three. The instructions were clear, the parts were all there (though metric), and it went together and mounted fairly easily. I only offer two cautions - if you don't have ceiling joists 4' apart you will need additional backing to provide needed support. And you will want an 11 mm driver on your drill to attach the 20 lag bolts included to attach the unit to the ceiling (there's nothing quite as irritating as having to reach overhead with a wrench or ratchet to screw in 2" lag bolts by hand). Once installed it works great and does hold 250# of stuff. The only improvement I recommend is to include a 3/8 shaft option to the winding handle so you can raise and lower the unit with a drill rather than by hand. (They include a 2-piece handle with a crank at one end that at about 5' long is too long for an 8' mounting height - you wind up cranking at knee level. Since I bought 3 (and got 3 cranks) I shortened one so it would crank at chest level and fitted the other with a 3/8 steel rod in place of the crank section. Connect that to a 3/8 drill and let electricity do the work. That said, the unit is well worth the cost and is highly recommended.
C**B
Strong lift ideal for handling large items
I purchased this for the storage of 2 12' stand up paddle boards and related equipment (roof rack, lifejackets, paddles, etc). For my first attempt I tried to do it cheap with a rope kayak holder for around $25, but that didn't cut it. I'm glad I swapped to this. The lift is well made and includes everything you need for the base installation. Many of the more popular reviews of this product state that the owners manual is wrong and the hardware is terrible. Some of those reviews are 4 years old and the comments about the manual don't match my manual, so I think they listened and changed a few things. I did have a few fun and games as my joists were not the standard 24", they were 24.5". I remedyed this by attaching a 2x4 then runnign the other way with the lift. This actually helped me a lot as it allowed the crank to be mounted away from the paddleboards. Assembly took me about 3 hours but that was due to my poor skills and even worse tools. Running out of battery power, constantly up and down steps as I didnt have the right tools. If you know what your doing this could be done in an hour. I'm really happy with the lift. It feels solid and works very well. Perfect for my needs. The only thing I didn't like was the inflexibility if you don't have perfect joists and also the gearing on the crank. It's a major workout to wind it all the way up. This can be resolved by using the power tool option to raise and lower it. Overall I am happy with this product
K**R
Excellent Hoist for Lifting, Storing and Reinstalling Jeep Hardtop
This hoist is rated for 250 pounds and I use it to lift, store and re-install the hardtop on my two door 2015 Jeep Willys. I considered electric hoists and various home made hoists before deciding on Racor. I decided a manual hoist made more sense than electric due better reliability and control of operation. The home made hoists were mostly contraptions made from ratchet straps which might work for lifting the top but not reinstalling it. The Racor hoist has been installed in my garage for more than a month and I'm quite pleased with the result. It turned hardtop handling into a one person job with reasonable effort. My garage has 11 foot ceilings and I'm over 6 feet tall. I can lift the hardtop and have enough room to walk underneath with several inches of clearance even with both Freedom Tops on top of the hoist. Standard installation requires the hoist's support rails to be 48 inches apart so if the joists in the ceiling aren't 12, 16 or 24 inches apart you'll need to first mount two 2X4 studs perpendicular to the joists, which I did. Be sure to measure everything and verify the joist locations at least a couple of times before you start drilling holes, especially in a finished garage. My garage is finished so I used 5 1/2 inch by 3/8 inch lag bolts from Home Depot to mount the 2X4's. The 2x4's were each about 6 feet long with each stud mounted with four lag bolts into four ceiling joist. This is probably way more strength than I need but I prefer the extra safety. Using the 5 1/2 inch lag bolts made sure I was getting through the studs, through the plaster board and into the joists. I pre-drilled 1/4 inch guide holes and it was a bear getting the lag bolts screwed in with a hand ratchet. An impact wrench would've been helpful. I also beefed up the rail mounting screws from less than 2 inches to about 3 inches to increase the tensile strength. I also increased the width 1/8 inch too. The pre-drilled holes in the rails were able to accommodate the larger size bolt. The pulley wheels and the gear box made a lot of noise so I gave them all a good shot of WD-40 which caused everything to work easier and quieter. There were a couple of bolts and washers from the parts list that were missing from the box but those were standard metric size items that I was able to buy at Home Depot. Also, the nuts attaching the cables to the wire frame via a C-bolt weren't even hand tight out of the box so those should be checked and tightened, if needed. I purchased three ratchet straps to hang the hardtop to the bottom of the wire platform. It could be done with two ratchet straps but three distributes the weight more evenly and provides more safety. You'll need some type of padding between your Jeep hardtop and the bottom of the hoist's wire frame. I zip tied plastic or rubber pipe insulators along the edges of the platform and then put an old quilt on top of the hardtop. I'm very happy with the Racor hoist for lifting, storing and reinstalling my Jeep top. It is useful for other storage too. As mentioned earlier there is plenty of room to hold the Freedom Tops and a few other items. I was able to assemble and mount everything by myself but did call a helper for a few minutes to make things a bit easier. My only gripe is a couple of small missing parts that cost a couple of dollars to replace at Home Depot. I suggest upgrading some of the bolts for better strength and safety although the included hardware is adequate.
M**H
Good product but packaging
Packaging was horrible second hand bags used for screws and washers etc which led to trhem spilling out as they had been teared and reused the box was ripped in several places leading to parts all over the delivery van least amount of foam was used so parts were scratched (only paint though) there was no clear packing order parts were just dumped in. the product works fine though so a massive down for the packaging and hassle.
M**K
Installation is easy unless you have to mount it across joists
Shipping was very fast and was surprised to see the package 2 days later. Installation is easy unless you have to mount it across joists. Overall it is a great product and works well.
A**R
Great little lift
Great little lift. I used it to make an adjustable bed for a camper and it works great. With a little tweaking, it raises and lowers a queen size bed from the floor to the roof in a toy hauler at a fraction of the cost of the fancy electric ones.
D**N
Jeep top removal/storage
Installed this for my 2004 TJ hard top. Easy install. Took my friend and I 30 mins to install. Super happy with this product as it allows me to remove jeep hard top solo in a minute. Added bonus is that you can store the doors and additional equipment on the rack. Love it.
E**R
Assembly instructions are easy to follow
Assembly instructions are easy to follow, lots of pictures to assist, only a couple of basic tools are required. The only thing I would suggest is to lay a 4' x 4' sheet of 1/4 or 3/8 plywood on top of the metal platform to maintain the rigidity of the metal rod platform and spread the weight. If you place any heavier items in the center without it, the platform tends to bow down a bit. Better safe than sorry. Otherwise a good product and would recommend buying it.
Trustpilot
3 days ago
1 month ago