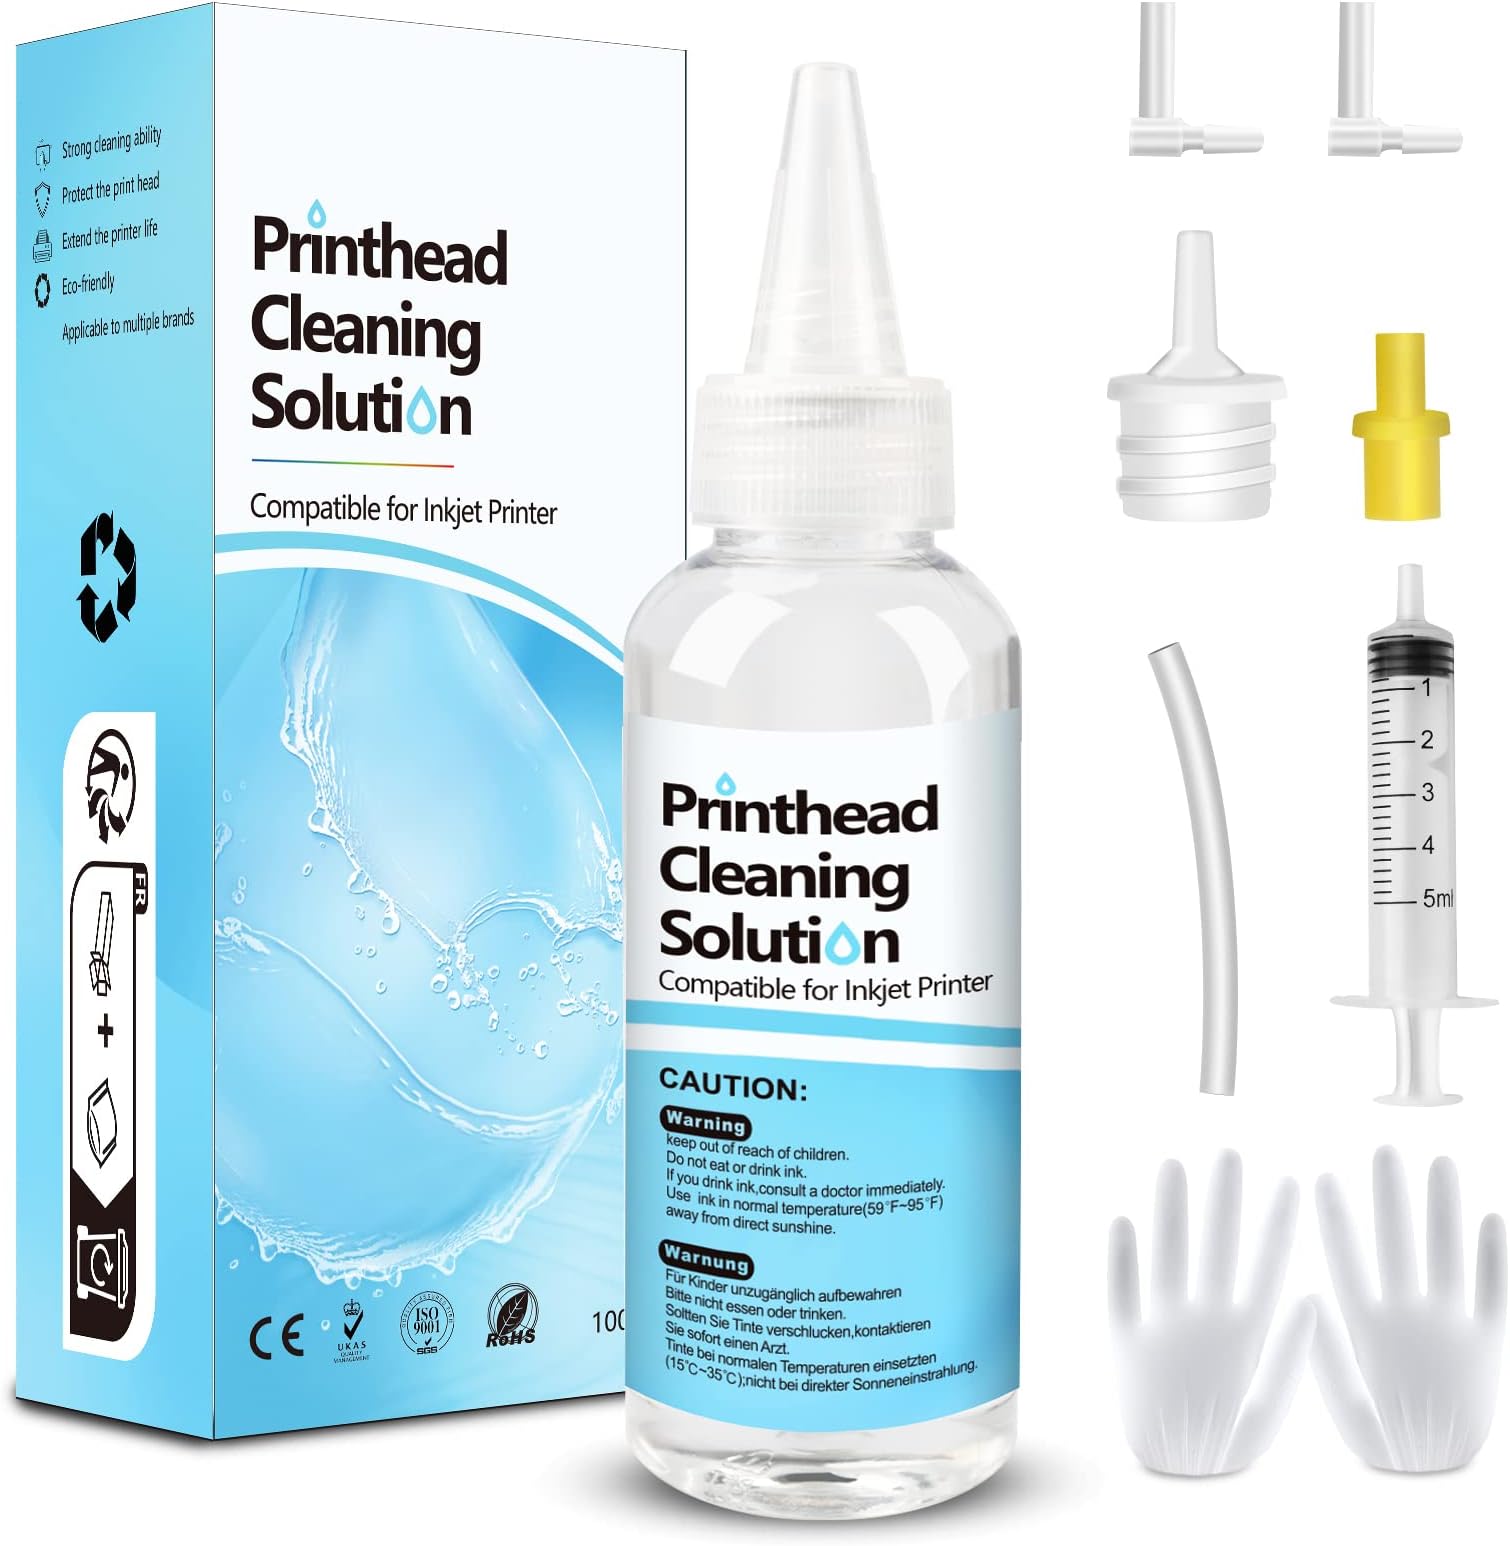

🖨️ Don’t let clogged nozzles kill your workflow—clean smarter, print sharper!
The Fosgoit Printhead Cleaning Kit offers a 100mL specialized cleaning solution with precision syringe and nozzles designed to dissolve hardened ink blockages in inkjet printers. Compatible with Epson EcoTank, HP, Canon, and other major brands, this kit restores printhead performance, extends printer life, and delivers professional-grade cleaning at home or office.


| ASIN | B08P18Q9WV |
| Best Sellers Rank | #2,886 in Office Products ( See Top 100 in Office Products ) #157 in Inkjet Printer Ink Cartridges |
| Brand | Fosgoit |
| Color | Clear |
| Customer Reviews | 4.3 4.3 out of 5 stars (2,396) |
| Date First Available | November 20, 2020 |
| Ink Color | Printer Head Nozzle Cleaner Kit |
| Item Weight | 5.6 ounces |
| Item model number | Inkjet Printer Cleaning Kit |
| Manufacturer | NUOK |
| Manufacturer Part Number | UN-UN100ML-T01-1PACK |
| Number of Items | 1 |
| Product Dimensions | 5.91 x 2.36 x 1.97 inches |
| Sheet Size | A4, Tabloid (11x17 inches) |
| Size | Printer Cleaning Kit 100mL |
P**E
Very good investment WOW
I tried printing a copy of a printer purge file that had all colors and check which color was having a clog. Two colors had a 100% clog. I tried printing several times with the same result. Then did a light head cleaning (3 minutes) and that did not work. Stoped doing the 7 minute clean up until I tried this product. I reluctantly purchased it as a last option before I gave up on the printer. Was already looking for new printers. When it arrived, i was ready but my ET-4700 did not readily lifted up to get to the printer heads. You have to remove two little screws right above where the printed page comes out. Then the top part goes up and you have full access to the printer heads. You have to put something to keep the top of the printer opened. The next step is to put paper towel right under the printer heads. You have to fold the paper very tightly as there is not very much clearance between the printer head and the bottom of the printer. The syringe can eject 5mm at a time. This is good so that you don't flood the bottom of the printer. The bottle comes with 100mm and it is recommended to flow no less than 20mm into each color head with a possible clog. After the paper towel is in placed between the printer bottom and the printer head, you have to gently take the soft plastic tubes out of the cassette (a little reservoir box where the ink passes right before it prints to the page) that sits right on top of each printer head. You have a choice to make as to where you plug the tube that comes out of your syringe. 1st Choice: Place the syringe tube on the same place as the soft plastic tubes that flow the ink from the big reservoir. 2nd Choice: Remove the cassette (a little reservoir box where the ink passes right before it prints to the page) that sits right on top of the print head and connect the syringe tube where the cassette makes contact with the print head. I chose the first one as it seemed the most thorough option. The videos I saw stat that it is almost always right on the head but I though why not clean anything in the cassette as well. Plus the syringe connection to the print head did not all that tight (worried about leaks). We did 4 flows (as the syringe has 5mm) for each troubled color (we had Yellow and Cyan with a complete clog). I had to be careful when i replaced the plunger after I filled the syringe with the clear fluid that came with the product. The plunger seems to have a very tight seal and I was afraid of shooting the liquid really fast as I replaced the plunger. After you shoot 10mm of liquid; move the head towards the other side of the paper towel to get that side ready for the other 10mm of clear liquid. If you see the paper towel completely soaked in ink. Then replace it. I recommend using the gloves (plastic bag material) that came with the product of use your own nitrile gloves. The paper towel will be very saturated with a clear solution and remaining ink. Move the head to the left or right and remove the paper towel. Use another paper towel for the next color but if you see too much liquid, clean the printer bottom before moving to the next clogged color. We only had two colors to do so, we used a few more paper towels to clean the bottom of the printer when we were done. Replaced the soft tubes that go to the cassette (gentle and slow proces) the tubes felt pretty delicate. We went ahead and did the full printing head clean regardless (7 minutes). You have to turn the printer off and then hold power button + help button for a few seconds to turn on into full cleaning mode. I had full ink on the tanks before I started this process and then seven minutes later I saw that all had gone down, mostly the black ink for some reason. Test post-product: Printed the head alignment page and surprise!! I SAW ALL FOUR COLORS in all their glory! Then printed a personal document and it was perfect. Very good product and resulted just as intended. Will definitely have this on hand and also use the printer more often from here on. Satisfied Customer.
E**H
Fixed my Epson ET-2400
Worked amazing! It unclogged my printer after it hasnt worked for almost a year. Now I use my printer on a daily all thanks to this product! It worked great with my Epson eco tank 2400 and it didn’t cause any damage. It was super easy to use and if i ever need it, I will buy this one again.
R**K
Take your time and allow extra time for print head to dry!!
Worked after several cleanings- had to wait 48 hours for print head to finally dry out still needs additional cleanings but did remove the clogs and printer is working again
P**L
Printer Cleaning Kit
I usually wait a few months to write a review on a product to see how it works. I had to clean the print heads on my Epson Eco Tank printer. I replaced the print box, it made no difference. I was ready to buy a new printer $300.00, when I saw a video online about this kit. I was fairly easy to do, the instructions are OK, but there are more detailed videos online, that make the job easier. I took me about 15 minuted to do it and the printer has worked perfectly ever since. I highly recommend it! It saved me $300.00
N**S
Worked for me in my Brother MFC-J4710DW
I was prepared for a mess but after having my Brother MFC-J4710DW in storage for over 3 years, the ink was toast. Even with new cartridges and countless cleaning cycles, the print quality was a disaster. I picked up this kit based on the reviews. It was pretty easy to use and made much less of a mess than I thought. It is far from mess-free but it put whatever wonder-juice its made of into the ink system and after many more cleaning cycles, and a week of just ignoring it, my print quality was back. It is not perfect yet, but there is improvement with each print. I'd say its about 99% with only a couple pixel width lines. All in all, i am happy. The kit worked. The fact that I got my printer back without major repairs makes it valuable to me. I can't argue with the cost. Good Value. It did take a bit to get the fluid out of the system and back to good ink, but once there, the print quality was satisfactory and the color accuracy was back to what I expected.
F**S
Fill up the toner waste part and cause more issues. I am done in owning printer
J**E
Cumple con lo esperado
J**S
Excelente, cumple con lo ofrecido. Realizar la limpieza con mucho cuidado y siguiendo detalladamente las instrucciones para no dañar tu impresora, pero vale la pena el resultado
L**S
Todo llego a tiempo, el producto funciona a la perfeccion ya lo use y si destapa los cabezales que tienen burbujas de aire.
Trustpilot
1 week ago
3 weeks ago