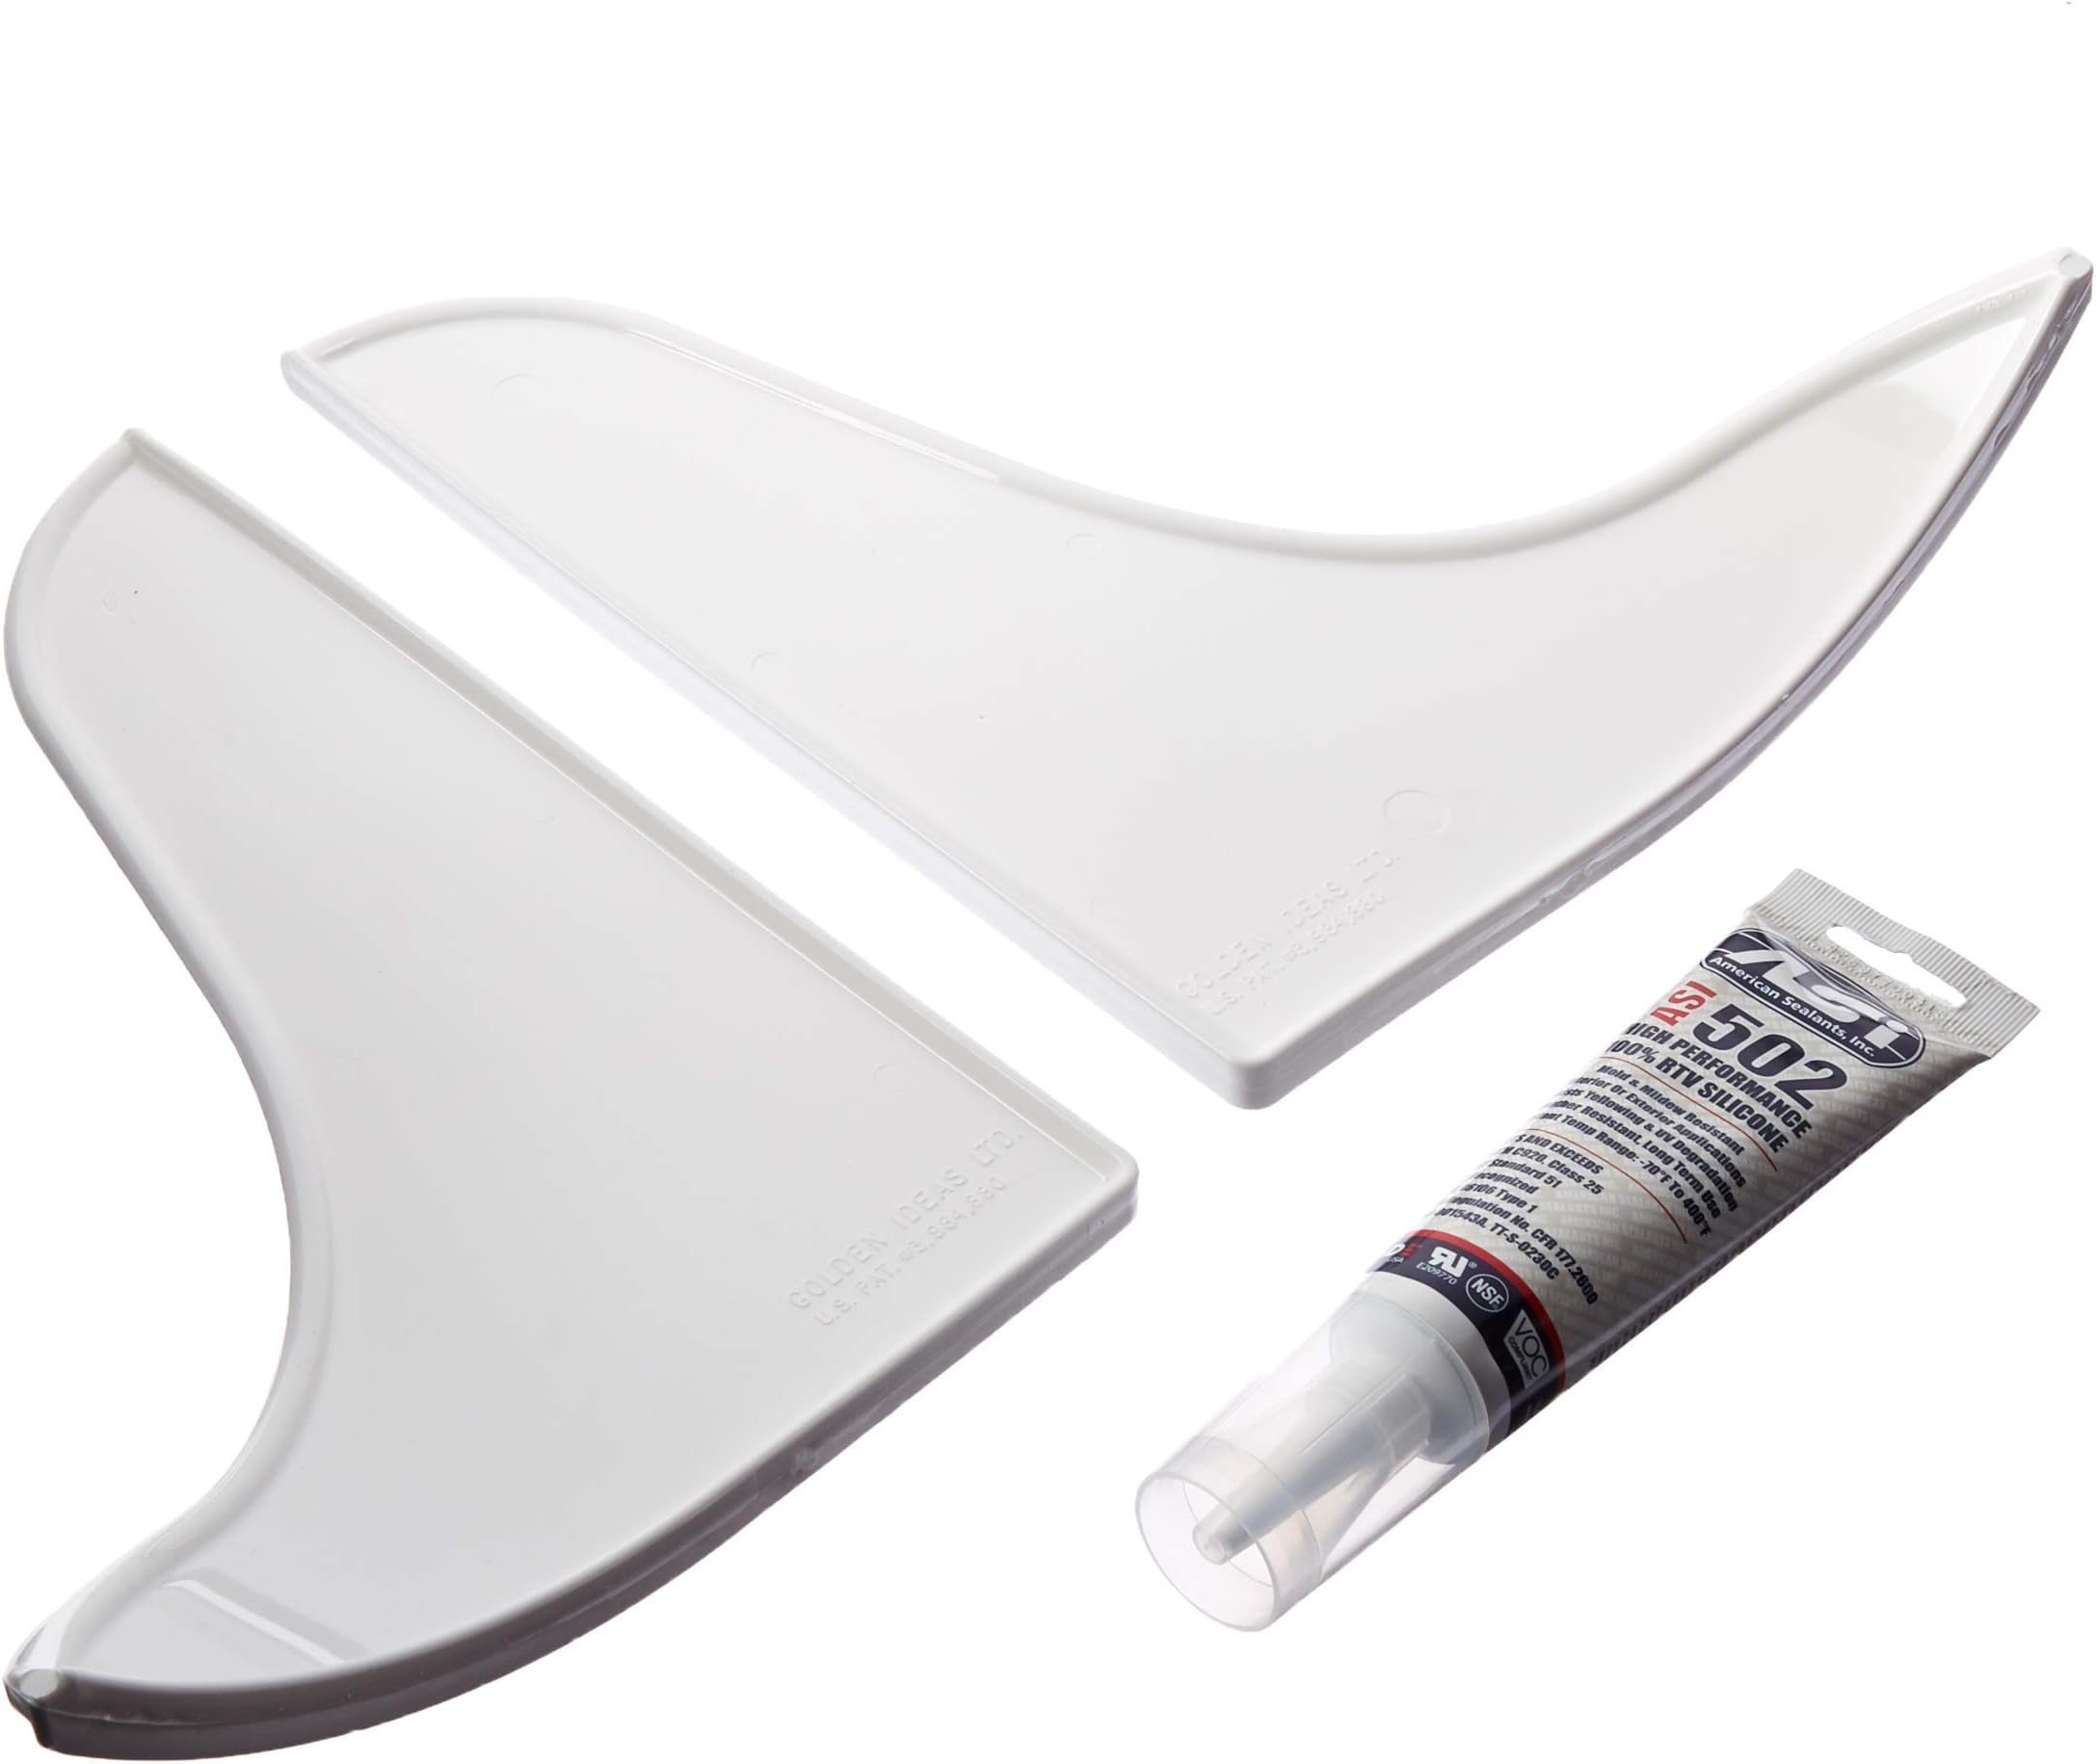
Splash Guards, White
Product ID: 1212999
💧Blocks water spillover beyond curtain
📏11in x 9.25in patented splash guard
🛠️Includes caulk/mastic for easy install
🚿 Keep your bathroom dry and damage-free with Tidee Tubb – the splash guard pros trust!
Tidee Tubb Splash Guards are patented curved barriers (11in x 9.25in) designed to block water from escaping between your shower curtain and wall. Sold in pairs, they include a dedicated caulk/mastic for easy installation, effectively preventing floor damage and reducing cleanup time.

| Customer Reviews | 4.0 out of 5 stars 165 Reviews |
L**P
Works Well
I have purchased this item for four different bathtubs. Easy to install. No problems with adhesive (sorry that some have had issues). Keeps water in the tub - prevents it from running down side. If hit hard enough the item will pop off, but that is to be expected as it is held on with an adhesive, not super glue : )
D**D
Works, with effort.
Our bathrooms have fiberglass tub units like, I would guess, most new homes have. For some reason however, splash guards are only made for tub units in tiled wall installations. Consequently, the splash guards are made to fit into a square corner, rather than the rounded corner in fiberglass units. That said, while most splash guards I saw in stores had a folding seal edge that could not be modified, the Tidee Tubb splash guards can be easily trimmed with a case knife to fit into a rounded corner. The adhesive that comes with the guards is not very good, perhaps because they are not intended for use on fiberglass. I would recommend buying a silicone caulk to install them, which is what I will do if and when the guards come loose again. They do work quite well once you overcome the installation problems.
S**N
Keep the water in!
This is a better design than a lot on the market, both due to the curved end (to channel the water into the tub) and for semi-permanent installation. While using a stick-on seems like a good idea (peel and stick! it's easy!), it won't last very long, will start leaking, and you'll have to replace it. It's better to do it right, and do it once, and get something that is well attached. I've used caulk and bonding compounds before, so this little job was easy. Make sure the surface is clean and dry. Follow the instructions. Let it sit without being bumped for the requisite amount of time. You're done.
C**D
Ignore the included instructions and follow mine and you'll be happier
They aren't perfect, but they appear to work quite well. However, the instructions and supplied caulk are horrible. I recommend that you do what I did to install them. You'll end up with a much better installation. 1. Open the package and toss the instructions and the tube of caulk. You probably want to take a quick read of what the piece of paper said, but you can ignore the instructions. 2. Get some really good caulk. You want this to stay put, last, be water-tight at the seams, etc., right? Don't buy cheap stuff. You just through cheap stuff away in step 1. I used a silicone caulk, which is probably the best but it doesn't clean up with water so it's harder to work with. 3. Get a Sharpie or a grease pencil, which you will use to mark the wall and top of the tub. If you don't know where you're going to put the splash guards, you'll draw all over the wall with caulk while getting it into place. 4. Inspect your current caulk seams to see if any fill-in is needed. You're going to have the caulk out, you may as well do the job right and not just install the splash guards. 5. Clean the installation location and the current caulk line where you may be doing fill-in. 6. Test the fitment in your desired installation location and figure out where you want it. Make a small mark on the wall and top of tub to indicate the placement of the tips of the splash guard. You'll likely find that there will be a large gap at the rounded tub edge. You can move the splash guard farther away onto the flatter part, but I think you don't want to get it too far away otherwise you might not divert the water quite how you want. You'll fill in any gaps with caulk later, so pay more attention to function than cosmetics at this point. 7. Using a utility knife blade, scrape all of the excess molding material off of the flat edges of the splash guards. Drag the blade sideways along the flat edges to clean them up. Mine had excess material that didn't allow them to lay flat on the surfaces. 8. Put a thin bead of caulk on the 2 flat edges of the splash guards and gently guide them into place using the marks. You're not doing the permanent installation right now, you're just getting the splash guards into place. Don't worry about caulk gaps, etc., just get it into place in the intended location. Seal up the caulk tube because you'll use it later. 9. Leave them alone and let them dry. The silicone caulk advantage is a reasonable setting time, but you might prefer water-based caulk which will take longer to set. Just let them alone right now. If you try to fill in the caulk gaps you'll move them around and create more work for yourself. If the caulk presses out too far, leave it alone, you'll deal with it later. Just put them into place and do something else. I did mine at night so I could continue working in the morning. 10. When the caulk is dry, get a razor blade and scrape off the excess caulk that pressed out where you didn't want it. You'll end up with caulk "dust" -- little scrapings you don't want -- so clean up after yourself before you continue. A wet terrycloth towel should do the trick. 11. Now you're going to do your caulk trim/seal/beautification work. Apply a bead of caulk along the edge to fill in the gaps. Wet your finger and lightly run it along the caulk bead. If you use silicone caulk you should have a paper towel to wipe the excess off of your finger. Trying to clean it off with water will make it sticky and it will spread on your hand. If you're using water-based caulk then you can just clean that off in the sink as you go. 12. Continue filling in the gaps and finger-wiping the caulk line until it looks nice and neat. The rounded tub edge will cause you to use extra caulk. Don't forget that you can use the razor blade later to clean up anything, so it doesn't have to be perfect, but you should strive for as good of a job as possible. 13. If you had caulk fill-ins to do, now is the time. 14. Clean everything up and put your tools, etc. away. You can save the remaining caulk but so often it dries up and is useless later so don't be optimistic. 15. Let the caulk dry for the amount of time recommended on the caulk tube. 16. You're done!
S**M
No more puddles!
Moved into a new house, and the shower always puddled over the corner of the tub onto the floor. Found these splash guards, read the reviews carefully, and ordered. Took a couple of extra beadings of the included caulk to seal 'gaps' due to the tub enclosure tiling, but once it set for 24 hours, no more puddles! These are rather large, so if you have a narrow tub access due to bathroom arrangement, or disability mobility items such as tub side support bars or shower stools, be aware this may decrease your ability to sit & swing your legs over tubside as you get in & out. If you can safely step in, there should be no problems.
A**R
disappointment
So, I bought these a year ago and have used several different caulk to stick them on. Nothing holds them on for very long. They have spent more time on the floor than on the tub. I just recently tried grouting them on hoping that would work. Alas no. Two days later and they are coming loose. My final try will be epoxy glue or some other permanent glue to stick them back to the grout. I'm not too hopeful. I would really like something to work so I can stop the puddles my children leave on the floor from running under the floor boards and ruining something difficult to fix.
J**A
Great look and great functionality
First of all, these splash guards are WHITE. I complained to Amazon that the color in the pictures is off, it's actually the "bone" color ones, but be confident you will receive white ones as the description says. I read the reviews and bought these based partially on that and partially on the appearance. These splash guards look better than I even thought. They are curvy and stylish, which is rare in this type of item. Who wants to spend hundreds of dollars on a nice tub and put some garbage on it? I don't know what other reviewers were talking about as far as trimming off small plastic ridges, I didn't have to do that. I just put silicone on the ends and fastened it to the tub. It takes a little bit of work to get it right and to stay while you smooth out the caulk but it was well worth it. I threw out the caulk that came with it and used 100% GE Silicone II. Don't fool around and use the silicone, the caulk degrades in water and is hard to get off. Now, my air bath can bubble away all it wants, the water hits the splash guards and goes right back into the tub!
H**M
They do what they say; perhaps a little too short for some applications
I didn't even know such a thing existed until seeing them on a tub in our new home. However, there were none in the bathroom we actually shower in daily, so after noticing how much water was escaping from the curtain I bought this set. In retrospect, I probably should have spent a little more on a taller model like the one in our downstairs bathroom: these are less than 1 ft high, and the natural fold in our shower curtain shakes out rather higher than that. So it still requires some attention from the user to adjust everything so the water doesn't get out anyway. On the plus side, they do clearly block Some of the leakage even when the showerer hasn't carefully adjusted the curtain. And, they were easily installed, even though my tub and enclosure walls are seriously out of plumb. I just used lots of cement - and there was plenty in the tube, even when I had to completely re-install the first one after foolishly turning my back on my 2-year-old while the cement was still wet! Also, I appreciated the minimalist packaging: just shrink-wrap with a set of basic instruction inside.
Trustpilot
1 week ago
4 days ago