We remain fully operational. Our teams are working around the clock to ensure your deliveries continue safely.

Descargar la aplicación


Servicios al cliente
Sobre nosotros
Copyright © 2025 Desertcart Holdings Limited
Descargar la aplicación


🌦️ Own the Weather: Master Wind, Rain & Direction Like a Pro!
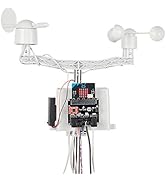
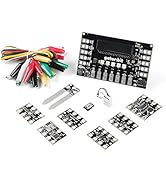
The Weather Meter Kit by SparkFun is a comprehensive DIY weather station solution featuring passive sensors for wind speed, wind direction, and rainfall. Utilizing magnetic reed switches and a sealed magnetic lead switch, it delivers precise, real-time environmental data with a modular mounting system and RJ11 connectivity, perfect for tech-savvy weather enthusiasts and professionals building custom monitoring setups.


| ASIN | B084DBXMPX |
| Additional Features | Passive sensors requiring external voltage source, detailed sensor information |
| Amazon Bestseller | #813,701 in DIY, Tools & Garden ( See Top 100 in DIY, Tools & Garden ) #13,779 in Outdoor Décor |
| Are batteries included? | No |
| Brand Name | SparkFun |
| Color | white |
| Connectivity Technology | USB, Wired |
| Customer Reviews | 4.2 4.2 out of 5 stars (52) |
| Display Type | No display |
| Frequency | 1 Hz |
| Included Components | Clamp, Stand |
| Item Weight | 1.59 Kilograms |
| Manufacturer | Fine Offset Electronics Co., Ltd. |
| Material Type | Multiple |
| Model | 15901 |
| Part Number | 15901 |
| Power Source | Corded Electric |
| Recommended Uses For Product | Rainfall, Wind Direction, Wind Speed |
| Sensor Technology | Mechanical |
| Shape | Round |
| Specific Uses For Product | Wind Direction Wind Speed Rain Buildup |
| Style Name | Modern |
M**E
I interfaced these wind and rain sensors to an Arduino. The sensors are actually just simple magnetic switches. The anemometer has a magnetic reed switch that closes every time it rotates around one time, and it has "somewhat" of a linear ratio of wind speed, to # of rotations per second. The wind vane uses multiple magnetic reed switches to create a resistor based voltage divider to generate different voltages for the 8 wind directions. Most of the time, you will only get directions for N, NE, E, SE, S, SW, W, and NE, but sometimes you can get 2 switches to close and get the inbetween directions of ESE, WSW, ENE, etc... not every unit seems to do this, and you cannot reliably get all 16 directions, so when programming, assume you're only going to get the 8 cardinal directions. The rain gauge is also another simple switch. Every time the measuring bucket inside the gauge tips, the switch will close/open. Every tip / switch change equals .011" of rain. Just count the number of switch toggles and you get rain fall. You can measure the time between tips to get the rate of rainfall in inches/hour. The 3 sensors are all made of plastic as are the supporting arms. The metal pole and screws used to attach the sensors seem like stainless steel. The sensors use RJ11 (telephone jack) connectors to connect. The wire from the sensors doesn't seem like anything weather resistant, so I an concerned that long term UV exposure will damage them in the long term, but right now I am just speculating. I got all of mine hooked up to an Arduino Nano and they work well for now.
R**N
So far the kit has been good, from what I can tell somewhat accurate result though I'm still in the building phase of my weather station. I do have one caveat though. If you are using this kit with SparkFun's weather shield, you will need to edit their source file of the "Weather Meter Kit" library. Specifically the SparkFun_Weather_Meter_Kit_Arduino_Library.cpp file. There is a comment about the shield using a different circuit therefore the values are different. I was getting wildly inaccurate wind direction readings and thought it was defective. Going to their sight and finding the weather meter station data sheet, I was able to confirm all of the readings of the resistance by direction were accurate. That meant the problem was either code or on the shield. Turns out a bit of both. In the referenced file I commented out these lines: // _calibrationParams.vaneADCValues[WMK_ANGLE_0_0] = 3143; // _calibrationParams.vaneADCValues[WMK_ANGLE_22_5] = 1624; // _calibrationParams.vaneADCValues[WMK_ANGLE_45_0] = 1845; // _calibrationParams.vaneADCValues[WMK_ANGLE_67_5] = 335; // _calibrationParams.vaneADCValues[WMK_ANGLE_90_0] = 372; // _calibrationParams.vaneADCValues[WMK_ANGLE_112_5] = 264; // _calibrationParams.vaneADCValues[WMK_ANGLE_135_0] = 738; // _calibrationParams.vaneADCValues[WMK_ANGLE_157_5] = 506; // _calibrationParams.vaneADCValues[WMK_ANGLE_180_0] = 1149; // _calibrationParams.vaneADCValues[WMK_ANGLE_202_5] = 979; // _calibrationParams.vaneADCValues[WMK_ANGLE_225_0] = 2520; // _calibrationParams.vaneADCValues[WMK_ANGLE_247_5] = 2397; // _calibrationParams.vaneADCValues[WMK_ANGLE_270_0] = 3780; // _calibrationParams.vaneADCValues[WMK_ANGLE_292_5] = 3309; // _calibrationParams.vaneADCValues[WMK_ANGLE_315_0] = 3548; // _calibrationParams.vaneADCValues[WMK_ANGLE_337_5] = 2810; and uncommented the similar lines immediately below them. Now the wind direction is accurate.
D**R
This was iffy. Not my proudest buy for a home made weather station.
J**.
I had an Ambient Weather model 2080 whose anemometer had quit registering on the base station, so I ordered SparkFun's weather meter kit. It was a perfect match for the Ambient Weather pieces. All I had to do was plug it into the power source/transmitter in the thermometer/humidity part for it to work. Here's a workaround for the only drawback I found, which was that with an additional length of pipe to work with, there was no way to keep the top pipe from twisting on the bottom pipe, which changed the reported wind direction. The SparkFun kit came with no instructions, so here's what to do: the arm which holds the rain gauge piece has a collar to hold it on the pipe, with two screws on top and two on the bottom. Secure the top two screws on the top pipe and the bottom two screws on the bottom pipe, with the seam between the pipes in between. This will prevent the top pipe from twisting and changing the reported wind direction.
E**D
Almost 2 years to the day I found one of the wind speed cups on the ground. Arm snapped off. I know it's plastic but just 2 years? Not even sure it when it happened or how windy it was but certainly not more than 20mph... Now where do I get a replacement?
Trustpilot
Hace 1 mes
Hace 2 semanas