We remain fully operational. Our teams are working around the clock to ensure your deliveries continue safely.

Descargar la aplicación


Servicios al cliente
Sobre nosotros
Copyright © 2025 Desertcart Holdings Limited
Descargar la aplicación


Buy anything from 5,000+ international stores. One checkout price. No surprise fees. Join 2M+ shoppers on Desertcart.
Desertcart purchases this item on your behalf and handles shipping, customs, and support to Spain.
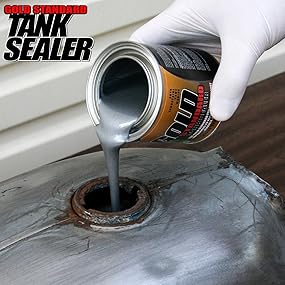
🛠️ Seal it once, ride forever — the ultimate tank armor for the savvy DIY pro!
The KBS Coatings 52000 Cycle Tank Sealer Kit is a comprehensive 3-step system designed to permanently seal and protect fuel tanks up to 5 gallons. Featuring a heavy-duty degreaser, rust remover, and a gold standard tank sealer, it creates a tough, non-porous barrier that resists cracking, peeling, and fuel corrosion—including ethanol blends. Ideal for motorcycles, ATVs, generators, and more, this USA-made kit delivers professional-grade results without specialized skills, ensuring your tank stays rust-free and fuel-tight for years.
| ASIN | B000IBDIX2 |
| Best Sellers Rank | #11,344 in Automotive ( See Top 100 in Automotive ) #19 in Automotive Sealers |
| Brand Name | KBS Coatings |
| Capacity | 5 Gallons |
| Color | Lightly Pigmented Silver |
| Customer Reviews | 4.6 4.6 out of 5 stars (1,515) |
| Fuel Type | Alcohol |
| Global Trade Identification Number | 00818032011112 |
| Included Components | Brush, Gloves, KBS Klean - 1 Quart, RustBlast - 1 Quart, Stir Stick, Tank Sealer - 8oz |
| Item Dimensions W x H | 6"W x 10"H |
| Item Type Name | Tank Sealer Kit - 5 Gallon Tank |
| Item Weight | 2.4 Kilograms |
| Manufacturer | KBS Coatings |
| Material | Nitrile |
| Model Number | 52000 |
| Part Number | 52000-S |
| UPC | 818032011112 |
| Warranty Description | Quite simply, if one follows application instructions & applies proper mil thickness, and you don’t believe our products perform just as well if not better than the products you are currently using, we will refund your product purchase. |
S**O
Great stuff!
This stuff worked exactly as advertised. I did the gas tank on my 1986 Honda Shadow that the previous owner had let the gas dry out in the tank so it had a lot of rust and dried varnish. I watched a few videos before even ordering the kit and felt like I had a pretty good grasp of what I needed to do for this to be successful. My favorite YT video was Cory on MotorcycleMD, who runs you through EVERY step of the way. The biggest concern I had was that my tank still smelled like gasoline after using the cleaner, so I cleaned it twice more with 5 parts hot water:1 part Simple green, dryed it out, then rinsed with 1 cup of Acetone before moving on to the etching Blast. I also had 1 pound of 1-1/4" wood screws inside the tank the whole time of cleaning and etching. Don't stir the paint for more than 5 minutes before dumping into the tank because it starts to thicken pretty quickly. The 3 days of drying didn't present a problem for me. If you are doing your tank, you should be doing your carbs too. I did my tank first, then the carbs while the tank was off the bike and curing. You can put your bike back together during those 3 days, you just can't put gas in the tank. I've got about 500 miles on the newly lined tank now and everything still looks perfect inside the tank and the bike runs like a top. I'm going to do my 92 Yamaha VMax next and the only thing I'm going do differently is to pre-clean the tank better before starting with the KBS cleaner.
J**E
Results of Excellent Kit
The product worked great on my Suzuki cappuccino. Technically a 7 gallon tank but the motorcycle kit was perfect. Had to preclean the tank with vinegar due to the heavy build up and rust. Turned out great after a power wash. I’ve used the more expensive POR15 kit and this is 100% equivalent of that system and had better prep accessories.
Z**L
Works well if you're patient
My bike is almost 40 years old and I'm at least the 3rd owner so I'm no stranger to finding and fixing "old bike problems." Last season the carbs started flooding intermittently. The bike would start to miss on one cylinder, and I'd look down to see fuel dripping out of one of the bowl vent hoses (which run to the underside of the bike). This usually happened when I started the bike to warm it up so I was able to shut it down with only a few drops of fuel on my garage floor, but it once happened while I was riding. I had to limp it home with fuel dripping past the exhaust under me. I got it home fine but I was sweating the entire time. Over the winter I pulled the fuel system apart. I found red rust particles everywhere, and the fuel filter hadn't caught them all. The tank had been lined by a previous owner and I couldn't see any rust-- until I turned it upside down. The coating on the top of the tank was delaminating, leaving behind a crusty, scaly mess that was running through the entire fuel system and causing the needle valves to bind up. Getting the old sealer out was a chore. I alternately filled the tank with boiling water and acetone until I could scrape or pull most of it out, then I filled the tank with wood screws and more acetone and shook it to loosen up what was left. I probably spent 2 weeks or more soaking and cleaning the tank to remove the old sealer, and I missed a couple of small spots. It would have to do. The KBS kit was simple to use. There's a degreaser, a rust converter that seems to be mostly phosphoric acid, and the actual coating, which is like a very thick silver paint. I cleaned and derusted the tank, then let it dry. As soon as it was dry, it began to flash rust again. I ended up derusting it 3 times, but no matter what, I would get a small amount of flash rust as the tank dried. Finally I decided that there was no good way to prevent it so when the tank was once again dry, I poured in the coating. Yes, I did this over a small amount of flash rust. Yes, this is risky. No, I don't recommend it. No, I haven't had any delamination or other problems. I spent the better part of 2 days rotating the tank to make sure all the surfaces were coated. I would change the orientation every 15 minutes, then every hour, then every few hours. I kept doing this until the coating fully solidified, which it did within 48 hours or so. Every time I repositioned the tank, I made sure to blow compressed air through the tank vent to make sure the coating didn't plug it. THIS IS IMPORTANT. Do not allow the tank vent to become clogged or you may have all sorts of fuel delivery problems later on, including fuel starvation and flooding. Assuming your tank hasn't been coated before, count on spending a full weekend doing this. I'd count on spending Saturday cleaning, derusting, and drying the tank, then wait until Sunday morning to pour in the sealant. That way you have a full day to rotate the tank around before the sealant starts to solidify. If your tank has been coated, removing it will be a chore. If I had to do it again, I would either sandblast the inside of the tank, or I would use an industrial paint stripper. I didn't do either because I wanted to save the paint on the outside of the tank, but I'm on the fence whether it was worth it. Because it was winter, the tank sat around curing for a few weeks before I was able to reassemble the bike and take it for a test ride. By that time, the coating had cured to a rock-hard, very durable finish. The coating covered bare steel, some light flash rust, and a couple of spots where the old coating refused to come off. I have now run a few tanks of fuel through the bike and so far the coating is holding strong. My bike is fully faired so it traps a lot of heat, and when the fuel level begins to drop the engine puts a lot of heat into the tank. So far, no delamination and no problems. We'll see what happens long-term but so far I'm pretty happy with this coating. The metallic silver gives the inside of the tank a clean, uniform look, so it's easy to spot any problems if you periodically shine a flashlight in there (which I do). Judging from the way a few drops of spilled coating adhered to the cardboard the tank was on, I won't have any problems with delamination-- it sticks TIGHT. This isn't the first gas tank that I've coated, but it's the first time I've used the kit from KBS. Last time I used POR15, which worked well on an automotive tank that I did for a friend. This stuff appears to be very similar and just as good for a less expensive price. Long-term durability is still unknown but looks promising. I wouldn't hesitate to recommend this kit to someone looking to refurbish their motorcycle tank.
G**M
Sealed up gas tank
I watched alot of videos on using some kind of sealer for an internally rusted up motorcycle gas tank. I settled on KBS because it was easy to use, and results were great. After using this product and following the instructions i now have a rust free, sealed tank that will never rust again. This stuff is unbelievably hard. The only suggestion is if you have a nicely painted tank, wipe it clean after each each application. Use wd40, or any penetrating oil on the outside of the tank to protect the paint. i didnt do that and i thought i'd just wipe off the redidue and be good...i now have small streak marks from the etching solution. my fault. but the final sealer results are better than expected. this stuff is super great! i now have a new nitch and service to provide because where i live , nobody offeres this. Probably cuz its teadiuse and takes a good week to get the best results. but worth it.
R**Y
This Works
This worked great used while restoring a couple of old hurricane lanterns to seal the inside of tanks. Take your time following directions it is a 3 step procedure.
U**L
watch the video
Took a long time to decide what to do about my fuel tank which had spotty rust areas from sitting too long. Alot of products are out there, watch the videos and decide what will work for you. If you are not patient and can't follow directions, don't buy this. Otherwise you will end up with a fuel tank that looks brand new inside. Not hard to use but you need to listen to what they are telling you. Good stuff!
R**D
Cleaned and sealed 1989 honda fourtrax gas tank. Took some time but turned out good. Follow instructions, watch some YouTube tutorial videos.
C**O
Lo usé para eliminar óxido del tanque de una Suzuki Boulevard 2007 y funcionó perfectamente aunque mi tanque era un completo desastre (ver fotos adjuntas). El tanque dificulta el drenado, por lo que recomiendo comprar sifones para eliminar el agua y limpiadores previos al sellador. Es muy importante limpiar, limpiar y volver a limpiar y luego secar y volver a secar y, de ser necesario, repetir y repetir. Este trabajo requiere mucha paciencia y tiempo, no puedes hacerlo con prisas. Recomiendo dejar 24 horas el desengrasante con tornillos para madera adentro y agitarlo con frecuencia. Debes revisar muy bien las uniones y zonas de difícil acceso para verificar que no queden gomas de gasolina vieja que, aunque no lo creas, es difícil de desprender. El desoxidante actúa en solo unos minutos, pero también recomiendo agitarlo con tornillos. Ya que lo retires, es necesario secar muy bien. Yo utilicé una secadora para el cabello. Apareció casi al instante óxido flash (unas ligeras capas como de polvo color óxido), pero no representan problema; puedes sellar sobre esto. Debido a que el tanque no permite el drenado sencillo, una vez que viertas el sellador dentro, es importante moverlo mucho para evitar charcos o acumulaciones en zonas específicas, ya que no podrás “tirar” el exceso. Yo adquirí una cámara endoscopio de las más baratas para revisar el interior a detalle. No se obsesionen revolviendo el sellador, nunca termina de mezclarse el color plata con el color negro, pero no hay problema por eso. Con revolverlo lentamente durante unos cinco minutos será suficiente. Ya dentro del tanque se eliminan los contrastes de pintura y deja un color plata bastante estético. Yo dejé secar por 8 días con la intención de que el curado no falle y funcionó perfecto. LA CLAVE ESTÁ EN LA LIMPIEZA PREVIA, OBSESIÓNATE CON LA LIMPIEZA PREVIA Y CON EL TIEMPO DE CURADO. Si tienes alguna duda adicional, escribe un correo al soporte de KBS; me contestaron en minutos y puedes enviar fotos para que te orienten. Ahí fue donde me dijeron que el óxido flash no es un problema. No pierdas tu tiempo enviando mensajes al celular que viene ahí; jamás obtuve respuesta.
M**O
Excelente producto cumple con su funcion de reparación y cubrir la superficie
N**E
As advertised. Take your time & follow instructions. Going on 6 months & no problems👍
D**8
Fast shipping. Really cleans the rust. Take time and follow instructions. I ordered a second set just in case I don’t have enough. Quality products.
Trustpilot
Hace 2 meses
Hace 1 mes