


🪚 Elevate your woodworking game with precision and style!
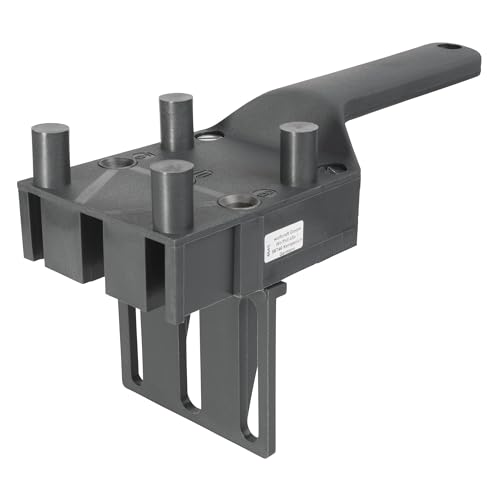
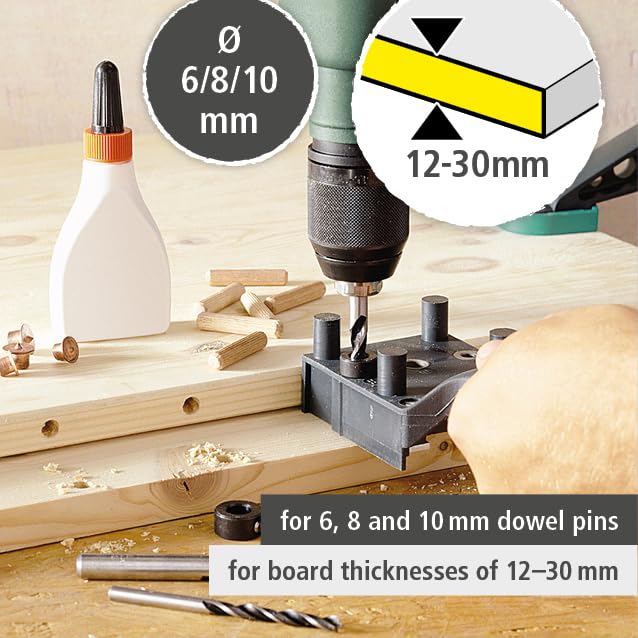
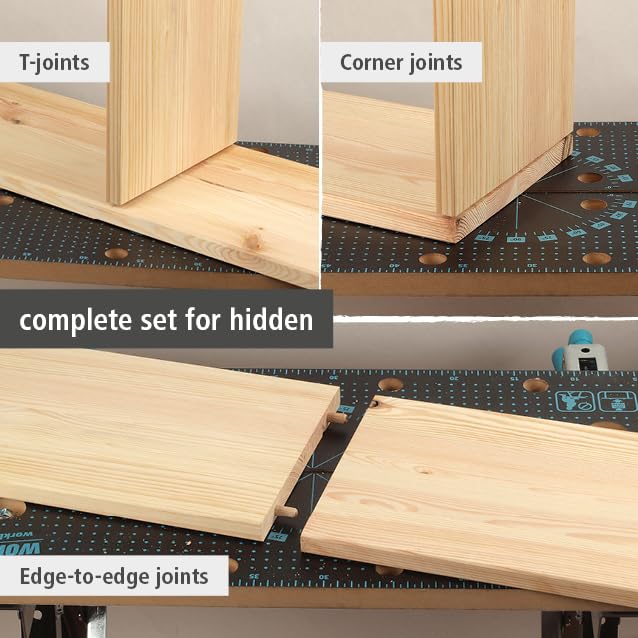
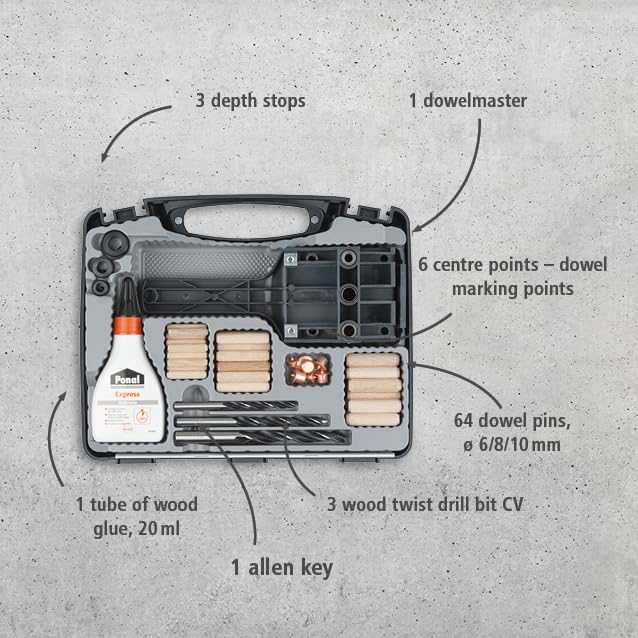
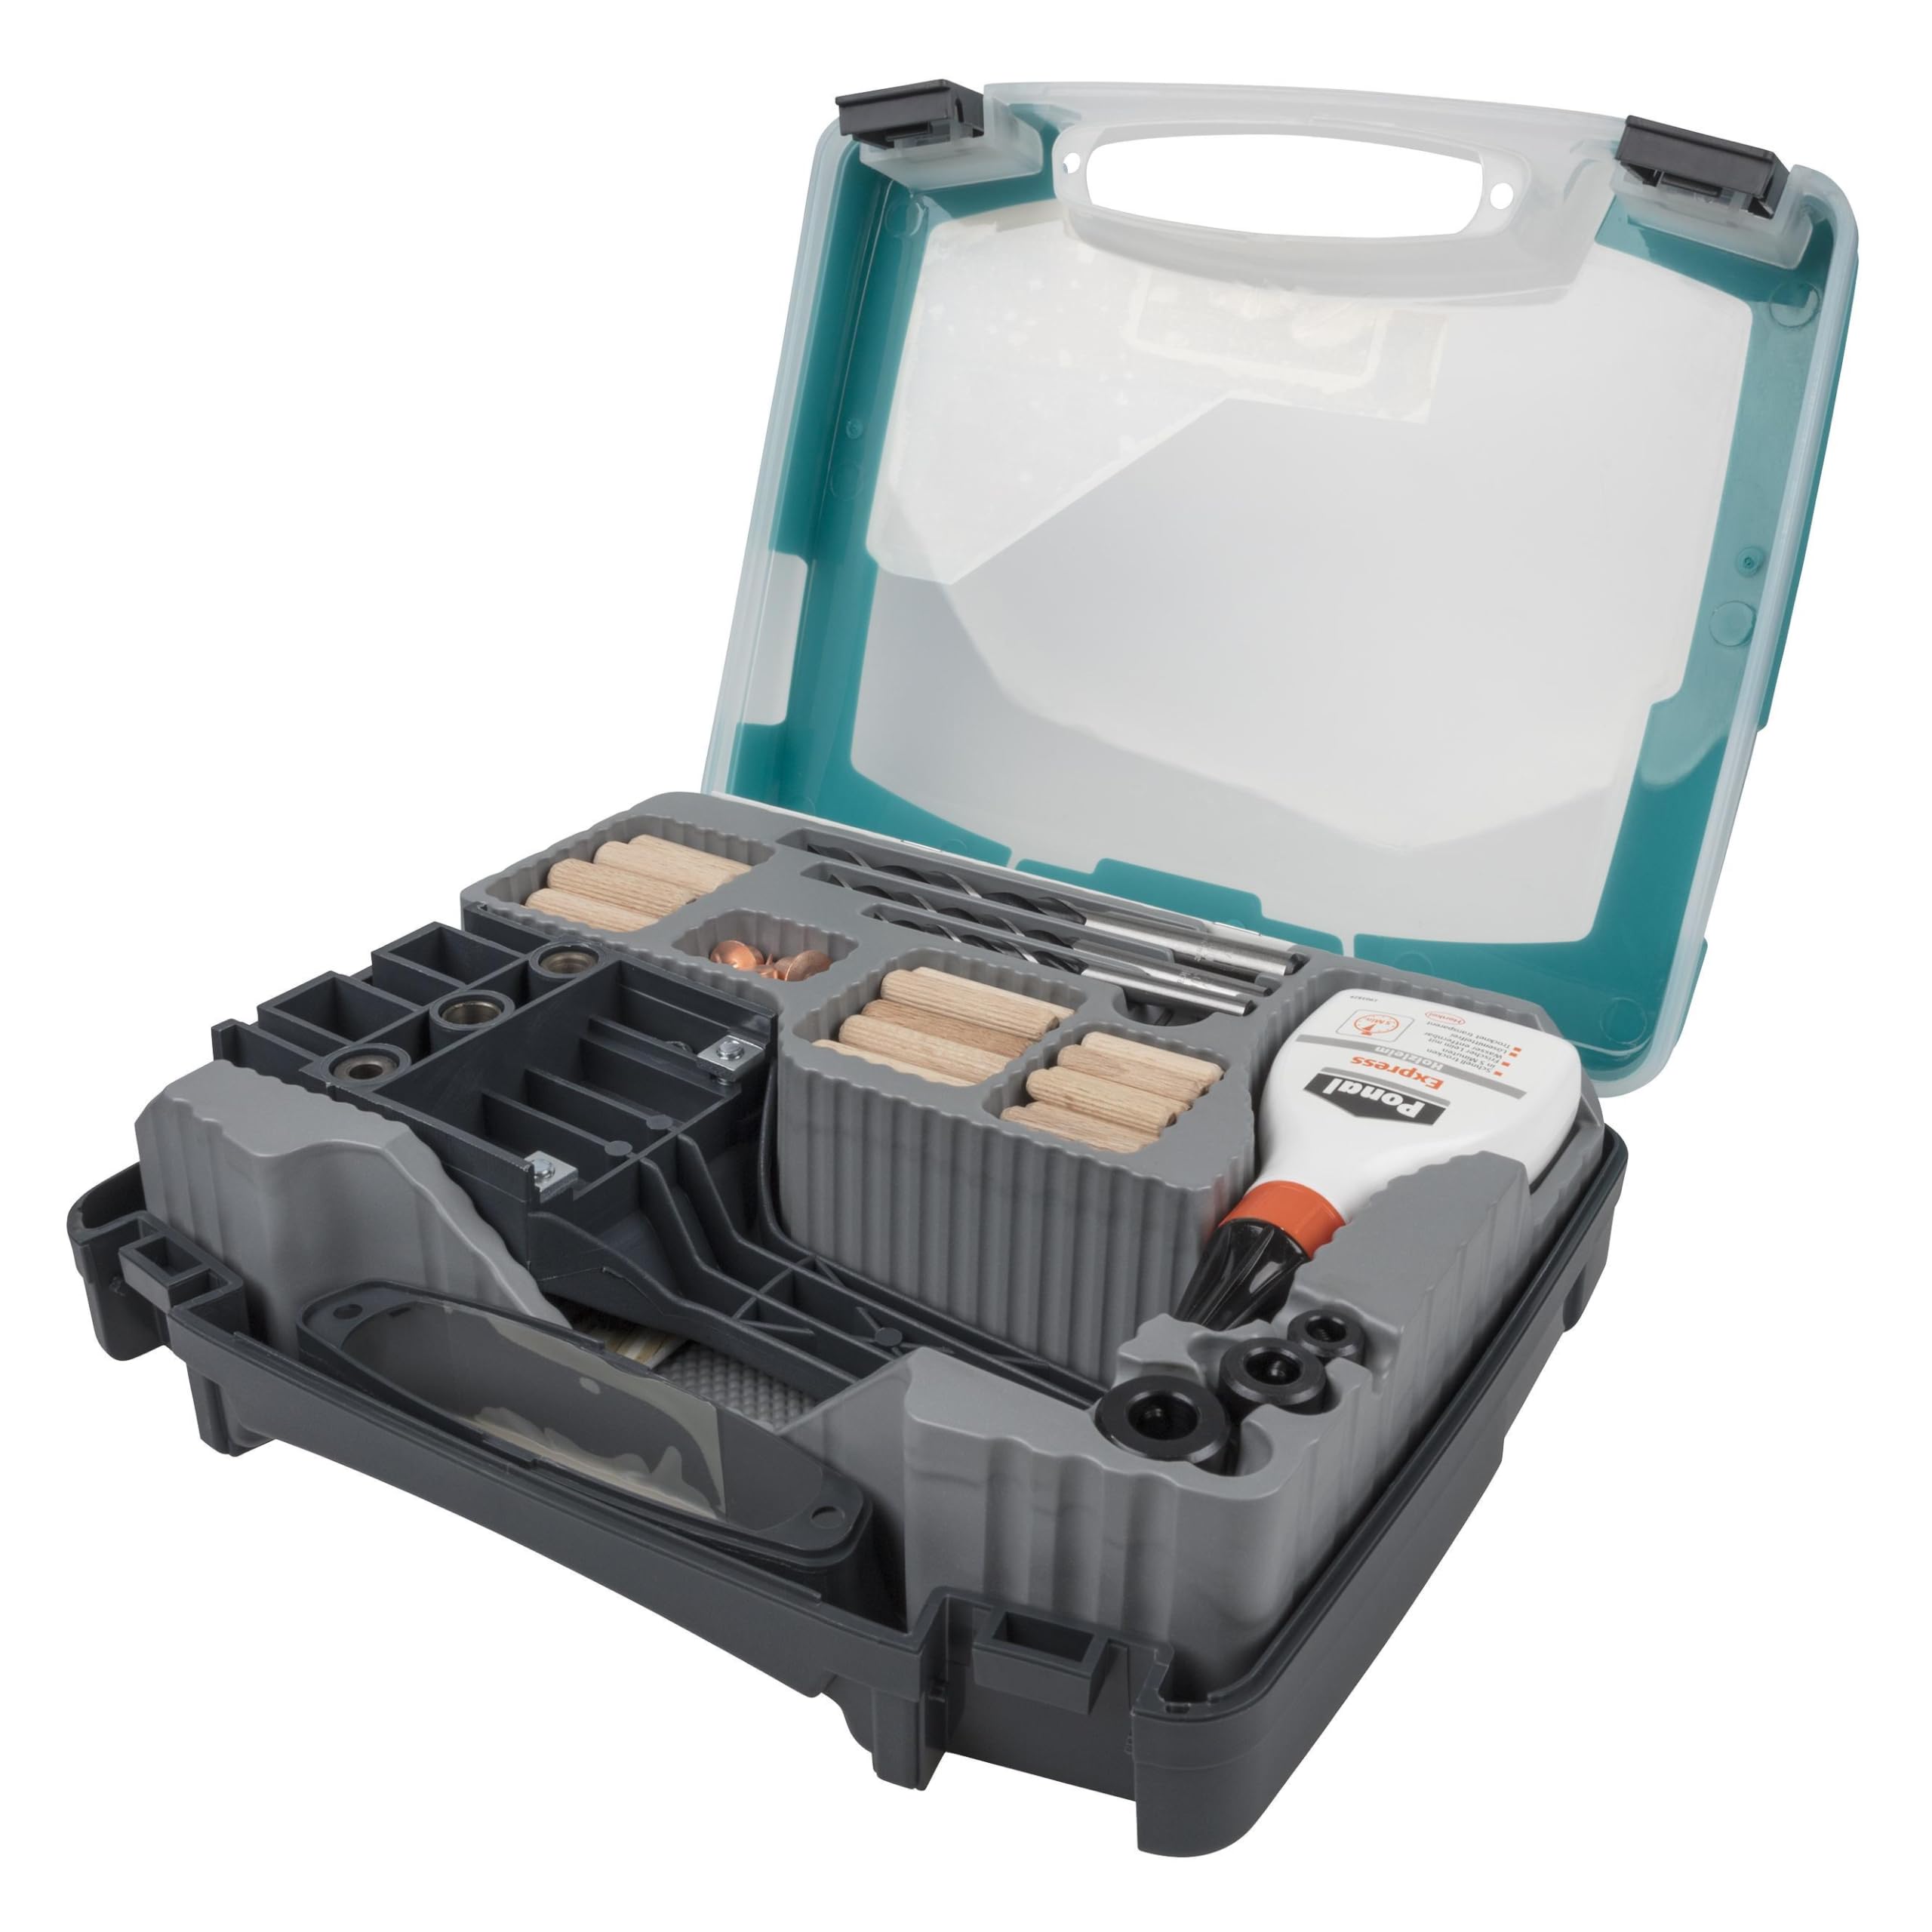
The wolfcraft Universal Dowelmaster Set 4645000 is a comprehensive 78-piece dowelling kit designed for professional-quality wood joints. It features an adjustable jig compatible with 6, 8, and 10 mm dowels, including drill bits, depth stops, centre points, and wood glue—all housed in a durable, compact case. Perfect for creating secure corner, T-butt, and edge-to-edge joints, this set is highly rated by both hobbyists and professionals for its precision, versatility, and ease of use.


| ASIN | B0001P19Q8 |
| Assembled Diameter | 1 Millimetres |
| Batteries Required? | No |
| Batteries included? | No |
| Best Sellers Rank | 3,587 in DIY & Tools ( See Top 100 in DIY & Tools ) 1 in Woodworking Project Kits 10 in Dowels |
| Customer Reviews | 4.5 4.5 out of 5 stars (23,041) |
| Cutting Diameter | 1 Millimetres |
| Date First Available | 16 Mar. 2006 |
| Included Components | 1 dowelmaster, 1 wood glue, 20 ml, 16 wood dowels, ø 10 mm, 22 wood dowels, ø 8 mm, 26 wood dowels, ø 6 mm, 3 depth stops, ø 6, 8, 10 mm, 3 wood drills, ø 6, 8, 10 mm, 6 centre points, each 2 pcs. ø 6, 8, 10 mm |
| Item Package Quantity | 1 |
| Item Weight | 824 g |
| Item model number | 4645000 |
| Manufacturer | wolfcraft |
| Number of Pieces | 29 |
| Part Number | 4645000 |
| Style | Universal Dowelmaster Set |
E**E
I've never drilled better dowel
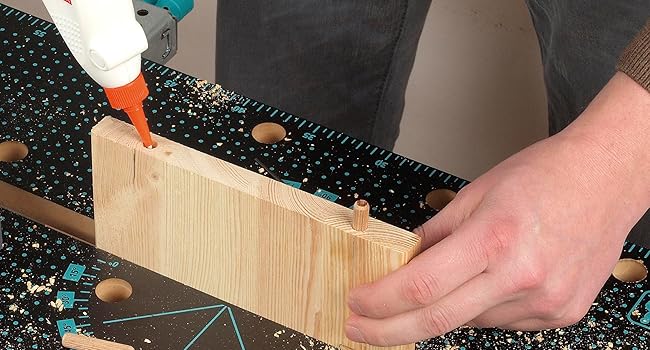
I recently purchased the wolfcraft Dowelmaster and I have to say, I am thoroughly impressed with its capabilities. As someone who enjoys woodworking as a hobby, I have struggled with achieving perfect joints in my projects. But with the dowel gauge, I am able to easily create corner, T-butt, and edge-to-edge joints in my boards without any hassle. First of all, the quality of the tool itself is top-notch. It is made of durable materials and feels sturdy in my hand. The markings on the gauge are clear and easy to read, making it simple to use even for a beginner like myself. The dowelmaster also comes with a drill gauge, which has been extremely helpful in ensuring that my holes are drilled at the correct angle and depth. But the best part about this tool is its precision. I have used it on various types of wood and the joints have always come out perfectly aligned. It has greatly improved the overall look and strength of my projects. I no longer have to worry about my joints being uneven or weak. The dowelmaster is also very versatile. It can be used for different types of joints and with different sizes of dowels. This has made it a staple in my woodworking toolbox, and I can't imagine completing a project without it. In terms of value for money, I believe the wolfcraft Dowelmaster is worth every penny. It has saved me time and frustration, and has greatly improved the quality of my work. I highly recommend it to anyone who is looking to achieve professional-looking joints in their woodworking projects. Overall, I am extremely satisfied with my purchase of the wolfcraft Dowelmaster. It is a must-have tool for any woodworker, whether amateur or professional. I can confidently say that this tool has taken my woodworking skills to the next level, and I am excited to continue using it in my future projects.
M**.
Very useful jig
For £18 I figured I couldn't go far wrong with this jig. It's surprisingly accurate and easy to use, just make sure you read the instructions and watch the plentiful videos available on using it. Once you get your head around its features and operation it's really nice to use. Make sure you pay attention to the drill depths for different types of joint (all explained in the manual) to avoid drilling holes too deep. It's a pity the guide didn't come with any depth stops but they're available separately. I would suggest getting the clamp style depth stops rather than the slide/screw depth stops as they look more substantial and less likely to slip. Personally, I use masking tape on the drills, reserving the depth stops for really precise work. In use I found the drill guides well formed and accurate. Clamping the work piece is advised. The jig handle can interfere with clamps in certain configurations, but nothing that can't be fixed by moving the clamps. I did notice the jig cannot drill holes extremely close to the edge of the wood, so this jig isn't for you if you want dowels closer than 35-40mm from the edge. This is due to the placement of the moulded pins of the jig. Using the jig I quickly used it to put together an Xmas tree base cover that can be dismantled for storage (limited storage space). The end result was excellent and quickly achieved, with the short end of the dowels glued in place and the long ends slotting into place to hold it together over Xmas periods. Overall I recommend this dowel jig to anyone with a need to use dowels occasionally.
B**N
Cheap but effective jointer
Easy to use dowel jointer at a reasonable cost, have used several times now with good results.
I**N
Good dowel master
Handy to have I’ve done one project with this dowelmaster yes I’ve used it once and it’s been put away. It’s something I don’t use every single day or once a month.
M**E
Better way to use this jig?
Several reviewers have commented that it is difficult to hold this jig steady especially when doing the first drilling into the end of your wood or panel. Several complaints about the jig moving slightly and the dowels not being quite vertical. The trouble is we might have been watching the wrong You Tube video, the English version where you clamp the wood vertically and try to drill down for into the wood while trying to hold the jig firm and steady at the same time which is very difficult. By accident I came across a Spanish video where the wood is clamped horizontally or at a slight upward slope towards the user and then you drill from the front. Assuming most of us are using the 8 mm dowels you can now use your weight pushing down on the handle of the jig and at the same time pushing forward with your thumb to keep the jig pressed squarely and firmly against the edge the the edge of the wood. You are also drilling forward which is slightly more comfortable than drilling down. Try this method and see what you think - I am sure like me you will find it to be a better and easier way. EDIT : having used this jig quite extensively on 18 mm melamine faced boards to make kitchen units here are my further comments. The first picture shows my inclined workmate raised about 2 inches at the front. This was easier than making an inclined ramp on my fixed workbench. It is weighted down by a heavy tool box which is also pushed hard up against a scrap piece of MDF to make the workmate really firm and solid. The MDF is just hung on the the workmate frame with a couple of cup hooks and is easily removable. The second picture shows me using the dowelmaster. You will see that I am not only bearing down on the handle to make sure the dowel enters the centre of the panel but also pushing with my thumb to make sure the jig remains square on to the board. The drill is a very old 300 watt Black & Decker which is not too heavy and does the job fine. You will notice it will be easier to remove build of wood chips when you are drilling your 28 mm hole as the exit path for the chippings is now almost horizontal rather than being vertical. The blue pads off cuts of these silicone type non slip mats. Even with strong clamps I found that because the melamine surface is so slippy there was a tendency for the board to move when pushing hard on the drill. The last picture is a few tips which you might find useful. I had to think of some easy way to provide depth stops to drill 28 mm into edges but only 14 mm into faces of boards. In my odds and end boxes I came across these black nylon spacers which were unused bits from fixing a wall mounted TV bracket and they have a 8 mm hole. The larger ones are 15 mm high and the smaller ones are 5 mm high. Using steel washers as well I can make up any length drill stop. The red one I use for drilling 28 mm edge holes and I just add the blue one to it as well to reduce the drilling depth to 14 mm for face drilling. The adavantage of these spacers are that they are very cheap and the nylon will not cause any wear on your jig. The other thing I noticed is that when the spacer stops spinning you have drilled down to the correct depth! You might be wondering why there is a piece of green and yellow earthing tape stuck on the top corner of the jig. Well I noticed that this angle was almost exactly over where the dowel hole is made in the edge. So if you want to be more precise where you put your dowel holes then just line up the middle green line over where you want your dowel! I was not impressed with the video recommending that you move the board 40 mm, using a ruler, when making T joints. I could see looking down the holes that I was a little bit out. I decided to use instead to use the raised edge on the side of the dowel master. The trouble is that it is grey plastic on grey plastic so not easy to line up. Just rub the edge with white chalk and blow off the excess and now makes lining up really easy. Last thing. I strongly recommend the 50 mm long confirmat screws in between your dowels if you can't glue your joints, which you can't easily do with melamine boards.
L**.
Valigetta completa di tutto quello che serve per le giunzioni a spina, lo strumento in se è ben progettato, ben costruito e con materiali di buon livello. Consente di ottenere vari tipi di giunzioni abbastanza precise in poco tempo e con grande semplicità.
Ö**.
Det kunde varit 4 st märkpiggar av varje dimension Men annars bra sats
M**U
Alles wat je nodig hebt om te starten.
J**W
Value for money
G**A
Perfect
Trustpilot
Hace 1 mes
Hace 2 semanas


